















 Bojan Veselinovikj |
July 7, 2026
Bojan Veselinovikj |
July 7, 2026


We're all striving to have the best result possible when taking a picture, but sometimes there are uncontrollable factors, such as lighting, that end up giving us unwanted anomalies, such as glare.
It's important to plan the photoshoot ahead to avoid such occurrences, but that's not always possible, and more often than not, we resort to "saving the photo" afterward in your photo editor rather than preventing the problem.
Luckily, thanks to modern technology and software advancements with AI technology, there are tons of ways to remove glare from a photo, whether that be in the form of a light glare, flash glare, sun glare, or a glasses glare.
In this tutorial, we'll talk about glare in detail, help you understand what it is, and most importantly, how to prevent it from occurring in all your future work, as well as how to remove glare in your photo editor should it appear in your photos.
Without further ado, let's get straight into it.
Reasons For Glare in Your Footage
Glare in photography refers to the unwanted brightness and reflections of light in an image.
It usually occurs when strong light sources, such as the sun, shine directly into the camera lens or reflect off shiny surfaces.
Glare can reduce the quality of the image in a few ways, for example, by washing out colors, reducing contrast, and making some details difficult to notice or completely hiding them.
Fortunately, we know the most common reasons that cause glare in your footage, so this guide should help you prevent it in the future.
Let's take a look at some of the main reasons unwanted glare appears in your photos.
Direct Sunlight
When shooting directly into the sun or when the sun is at an angle that allows its light to enter the camera lens, it can create glare. This is also sometimes referred to as lens flare or sun glare.
On some occasions, this is a wanted effect. Some people even add it artificially in photo editing tools.
Reflections
Shiny surfaces, such as glass, water, or metal, can reflect light directly into the lens, causing glasses glare. The most common example is taking a picture of someone wearing glasses while having a light opposite them shining directly into them, creating glass reflections.
Make sure to manipulate and properly place the light source beforehand so that you don't have to remove glasses glare later on.
Lens Flare
Lens flare occurs when light enters the lens and interacts with the lens elements, creating artifacts like streaks, circles, or blobs of light in the image. The most common example is the sun during outdoor photoshoots in daylight.
To remove light glare of this type, there are several options available, but it's best if you can prevent it by planning the best angles and the time of day during which you want to take the photos.
Unwanted Light Sources
Other light sources, such as streetlights, car headlights, or artificial lighting, can contribute to unwanted glare if they are positioned in a way that their light enters the lens.
This is mostly uncontrollable, as the above-mentioned objects are almost everywhere unless you are a professional photographer shooting in a studio.
Also, to avoid having to remove flash glare, make sure you don't use the flash on your device unless it's absolutely necessary to do so, and only in controlled conditions where it won't reflect off anything.
Improper Lens Coating
The quality of lens coatings can affect how well a lens handles light. Lower-quality coatings may be more prone to producing unwanted glare.
Investing in better gear may solve this problem, but it cannot be the case for those who casually take pictures using their smartphones, for example.
Dirty or Smudged Lens
Dust, fingerprints, or smudges on the camera lens can scatter light and contribute to unwanted light spots and glare. Make sure to clean your camera lens before taking a photo to prevent glare, so that you don't have to put time and effort into glare removal later on.
Internal Reflections
Light bouncing around inside the lens or camera body can create internal glass reflections, leading to glasses glare. Take a few test photos to see if any light glare appears before moving on to the real work.
Lens Aberrations
Certain optical aberrations in lenses, such as chromatic aberration or spherical aberration, can contribute to the formation of light glare.
Use of Filters
Low-quality or poorly positioned filters can sometimes introduce glare and glass reflections, especially if they are not coated to reduce distracting reflections.
Atmospheric Conditions
Haze, fog, or mist in the air can scatter light and contribute to unwanted glare in photos, particularly when shooting over long distances.
How to Remove Glare From a Photo With Boris FX Continuum
There are many ways to remove glare from a digital image using modern photo editing tools and AI technology, following simple steps.
Most popular programs, such as Photoshop, have the required tools needed for you to fix any imperfections in your photos effortlessly, including sun glare.
However, the process is usually much simpler and easier when using a renowned third-party plugin that offers tools specifically designed for the task.
One of those plugins is Continuum by Boris FX, available for all popular editing software, with a free trial version included.

Continuum, amongst the many other tools, filters, effects, and transitions it offers, has a glare remover tool that we'll show you how to utilize when you want to remove glare from photos or videos.
We'll be using Adobe Premiere Pro for this example, but note that you can use Continuum's tools in other software too.
Launch Premiere Pro and Import Media
The first step is to launch Adobe Premiere Pro on your PC.
Once it fully loads, import media by navigating to the "Project" tab, then right-clicking an empty area and choosing the "Import" option from the menu.

From here, all you need to do is find the images/videos with glare that you wish to remove, then select them and import them into the software for glare removal.
Create a Sequence and Name it Adequately
Once the media is imported within Premiere Pro, whether that's an image or a video, the next step is to add it to the timeline, which will in turn create a sequence we can work on.
You can do this by dragging and dropping the media from the "Project" tab over to the timeline area, as shown in the image below.

The next step in this part of the process would be to properly name the sequence. This isn't mandatory when working on a simple project with not more than one or two images or videos, but it's good practice and will help with more complex projects.
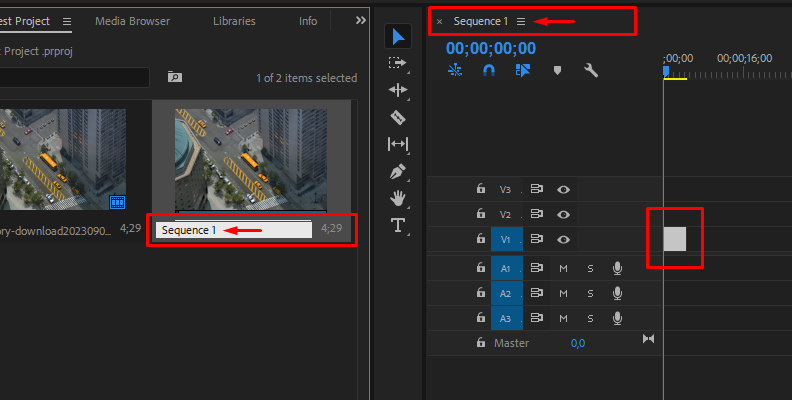
Simply click on the name of the sequence, and you'll get the option to rename it. Repeat this with all sequences if you're planning to have more in the project, or just continue with the next step if you're only working with this one video or image.
Find and Apply the "BCC Remover" Effect
In Premiere Pro, you can find all effects that come free with the software, and those that you implement by installing plugins, within the "Effects" tab.
If you've installed the Continuum pack by Boris FX, all effects should be available to use.
So, head over to the "Effects" panel, then use the search bar to type in "Remover" and you'll see the "BCC Remover" effect under the "Video Effects" -> "BCC Restoration" folder, as shown in the image below. Then simply drag and drop it over the video or image on your timeline.

Mask And Remove
Now that the effect is applied to your photo/video, open the Effect Controls panel in Premiere Pro.
We'll use the "Clone Spot" option in this specific example, but feel free to experiment with the other methods too, like "Clone Shape", "Auto-Fill Smooth" and "Auto-Fill Sharp" to remove glare from photos.
So, in the Effect Controls panel, choose "Clone Spot" as your removal method type, and then you'll get the option to expand the "Clone" section.

You'll notice in your video preview section that a small circular spot has appeared. Use the "Destination" parameter to position it over the source of the glare. Use the "Source" to choose where the BCC Remover will draw information from. Think of it like a copy and paste, with the "Source" parameter being the copy, and the "Destination" being the paste.

Then, use the "Radius" and "Feather" parameters to control the size and smoothness.
Use "Destination Angle" and "Opacity" to further smooth out the look of the mask and reduce glare.

You can adjust other settings too, such as the brightness, clone color, and more.
When done, the glare spots should be properly masked, but the settings needed to achieve this will be different for each photo or video, so we cannot provide the exact steps to remove glare from a specific image.
The BCC Remover tool has many parameters and methods that you can adjust to professionally remove glare and retouch the image. Take a look at this official guide by Boris FX for the BCC Remover tool for more information on how to use it.
Also, this video tutorial will help you see the tool in action, as well as show you other approaches to using it, including tracking with Mocha, and more.
Note: Please note that if you want to remove glasses glare or remove light glare, the final image result will be only as good as the original conditions are.
For example, it is just not possible to remove glasses glare completely and without losing any real detail without having the subject photographed without glasses too, so you can blend the two images afterward. A workaround would be to pick a color from their skin tone and repaint the glasses, making it look like there wasn't a glare, for example, but these methods are not perfect.
To remove light glare, there are more options, like the one we described now, using a clone tool, but this may also be noticeable due to the repeating pixels in the image. You can use AI to reshape the environment and add or remove entire elements from the photo, but simply removing the glare while keeping all original detail is not possible, since you must replace the removed original pixels with something.
Sometimes it can be as simple as masking the glare area and creating an adjustment layer with separate color correction settings to "tone down" the glare, but other times it can be a very complex project, especially if you must preserve details like human eyes.
How to Remove Glare in Photoshop
With the right steps, you can do anything in Adobe's photo-editing masterpiece, including removing reflected light, applying a camera raw filter to clear up the image from hazy shine, removing light reflections, sun glare, skin glare, and much more, all in just a few clicks.
Photoshop is the best sun glare removal app if you know how to use it properly, so let's take a look at some methods used frequently by the pros for removing glare in this software.
Method 1: Using Dodge and Burn
Duplicate the Layer
Duplicate the layer by pressing Ctrl + J (Windows) or Command + J (Mac). You can also manually right-click the layer within the Layers panel and choose the "Duplicate Layer" option.

Apply Dodge and Burn
Choose the "Dodge Tool" (for brightening) or "Burn Tool" (for darkening) from the toolbar. Adjust the tool settings, including the Range (Highlights, Midtones, Shadows) and Exposure.

Use the Dodge Tool to lighten the surrounding area not affected by glare, and the Burn Tool to darken the glare.
Use Layer Masks
Add a layer mask to the duplicated layer. Use a soft brush with black on the mask to selectively hide or reveal the Dodge and Burn adjustments.
Method 2: Using Content-Aware Fill
Duplicate the Layer And Mark The Glared Spot
Duplicate the layer with the sun glare. Then, use the "Lasso Tool" or "Marquee Tool" to select the area with glare.

Apply Content-Aware Fill

Go to Edit > Content-Aware Fill. Adjust the settings in the Content-Aware Fill dialog box and click "OK."

Refine with Healing Brush or Clone Stamp
Use the "Healing Brush Tool" or "Clone Stamp Tool" to further refine the glare removal area if needed.

Method 3: Using the Spot Healing Brush
Choose the "Spot Healing Brush Tool" from the toolbar.
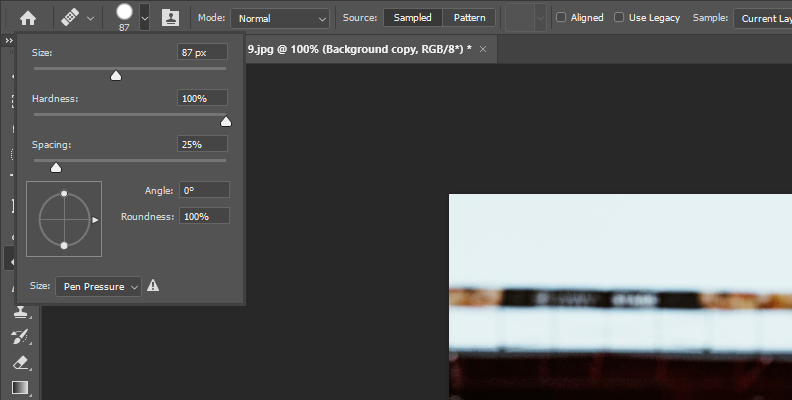
Adjust the brush size and hardness based on the size and edges of the unwanted glare, then paint over it, which will make Photoshop automatically sample and replace the pixels of the sun glare.
Final Words
That's all you need to know about glare, why it occurs, and what you can do to remove glare from photos or videos.
Hopefully, this will help you with all your future work.
Good luck!