BCC Beat Reactor Integrated

Nested Subgroup

BeatReactorIntegrated

Overview

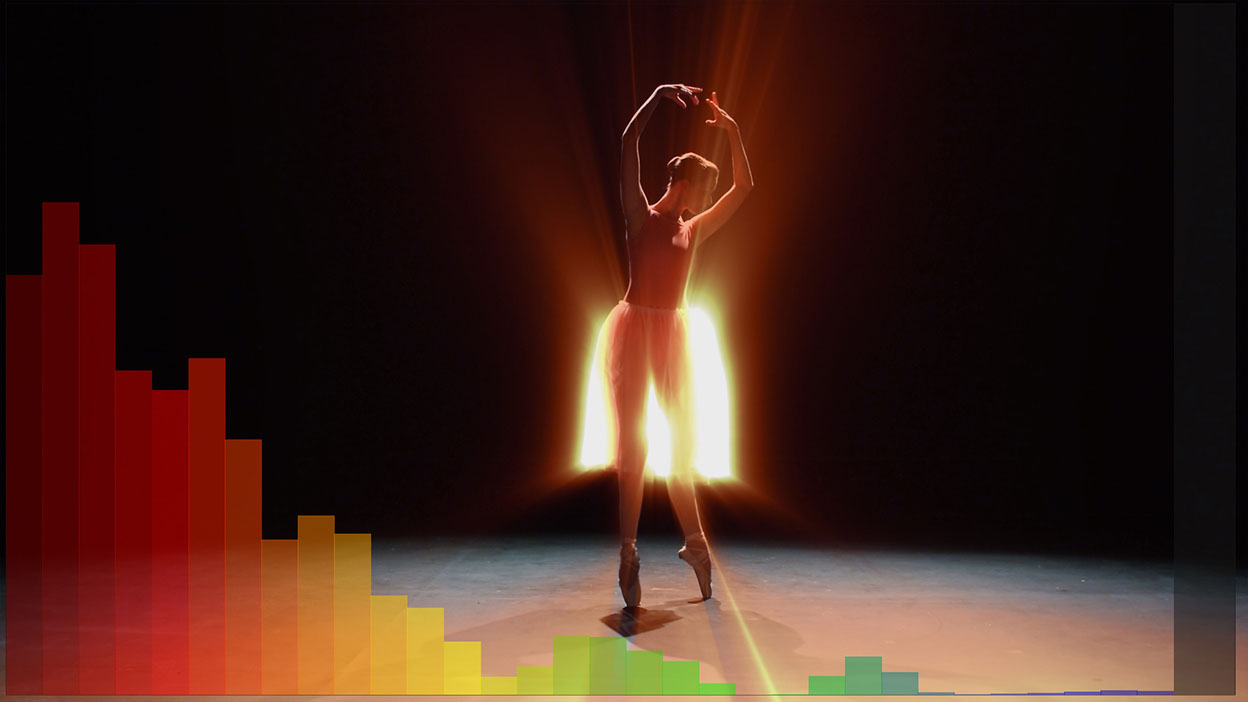
Beat Reactor is a parameter group found at the bottom of some BCC and FEC filters which can be used to influence other effect parameters within the filter based on an audio track within the composition. Beat Reactor displays a spectrum graph including vertical bands representing the audio levels within various frequency ranges. This graph can be used to help target particular elements within the audio track for use in influencing other effect parameters.

The BCC product also includes a BCC Beat Reactor standalone filter found in the BCC Time filter category. The standalone filter can be used to influence any parameter in an AE composition, and it has a somewhat different workflow and has its own Help file document.

Function

Presets and Common Controls

BCC filters come with a library of factory installed presets plus the ability to create your own custom presets and preview them  with the BCC FX Browser™.

BCC filters also include common controls that configure global effect preferences and other host-specific effect settings.

For more information about working with presets and other common controls, Click Here.


  • Beat Reactor is a parameter group found at the bottom of several BCC8 for Sony Vegas filters which can be used to influence other effect parameters within the filter based on audio. Beat Reactor displays a spectrum graph including vertical bands representing the audio levels within various frequency ranges. This graph can be used to help target particular elements within the audio track for use in influencing other effect parameters.

  • The Sound Layer popup will display all layers present in the composition. To use Beat Reactor it is necessary to first select the layer including the audio you wish to use for influencing effect parameters. Once a Sound Layer with audio is selected, by default the spectrum graph should display bands on frames including any significant audio levels.

  • Note: to select the audio when using Beat Reactor in All hosts besides After Effects, it is necessary to use an external audio file as described toward the end of this document*.*

  • The Channel popup allows for having the spectrum graph display Left, Right, or stereo Mix from the audio layer.

  • Delay (sec) offsets the spectrum graph display in time from the audio (so it should be applied after sampler rectangles are set).This allows for offsetting the affect on parameters in time from the audio. Negative values result in the affect on parameters starting ahead of the audio event and positive values result in the affect on parameters following the audio event. It is often useful to use a small positive value (.1 second for example) to create the impression that the audio event caused the change created by the Beat Reactor.

  • In order for a white sampler rectangle to appear on the spectrum graph, it is first necessary to select a parameter from one of the Apply Parameter popup menus.

Beat reactor Integrated 1

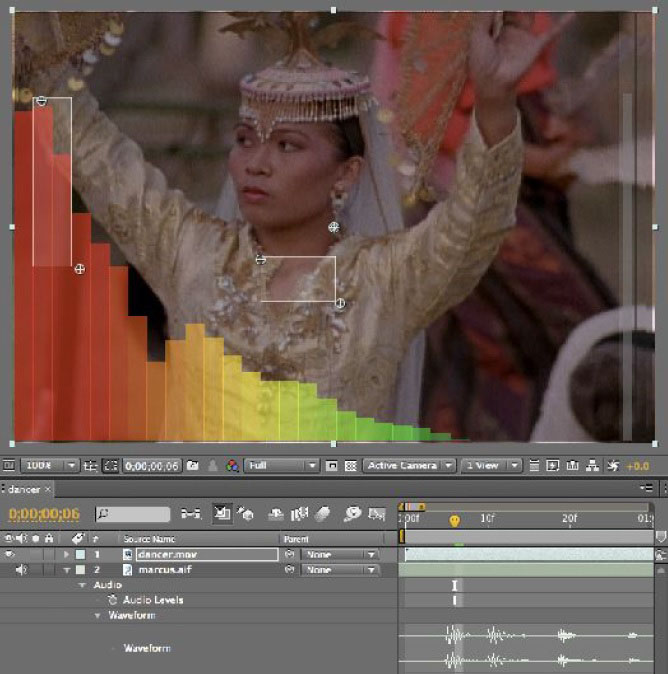
Each enabled Apply Parameter is represented by a white sampler rectangle on the audio spectrum graph display. While targeting audio events with Beat Reactor, it can be useful to expose the audio layer’s waveform display in the AE timeline panel to get a sense of the audio patterns over time and the relative audio level of the current frame.

The process of using the audio spectrum graph sampler rectangles to target a particular audio element within an audio layer for use in influencing effects parameters involves a workflow process something like this:

  • Make sure that the AE audio playback can be clearly heard with as much detail as possible (turn up the speakers or plug in the headphones).

  • Enable audio playback for the audio layer chosen as the Sound Layer in the Beat Reactor group, and disable audio playback for any other layers in the comp (to be able to hear the important audio layer more clearly).

  • In the AE timeline, set the work area to an area including the effect using the Beat Reactor.

  • Preview To Ram (PTR) with audio, listening carefully while closely watching the graph to see the movements in the spectrum bands that coincide with the audio event of interest. It is often useful to let the PTR loop a few times listening/watching carefully in order to get a good look at it.

  • Pause PTR playback and position the current-time indicator on a frame at good instance of the audio event of interest. It can sometimes help to scrub the timeline with audio to do this accurately. To scrub audio and video in the AE Timeline panel, Ctrl-drag (Windows) or Command-drag (Mac OS) the current-time indicator. If you stop moving the current-time indicator while keeping the mouse button depressed, a short section of audio loops.

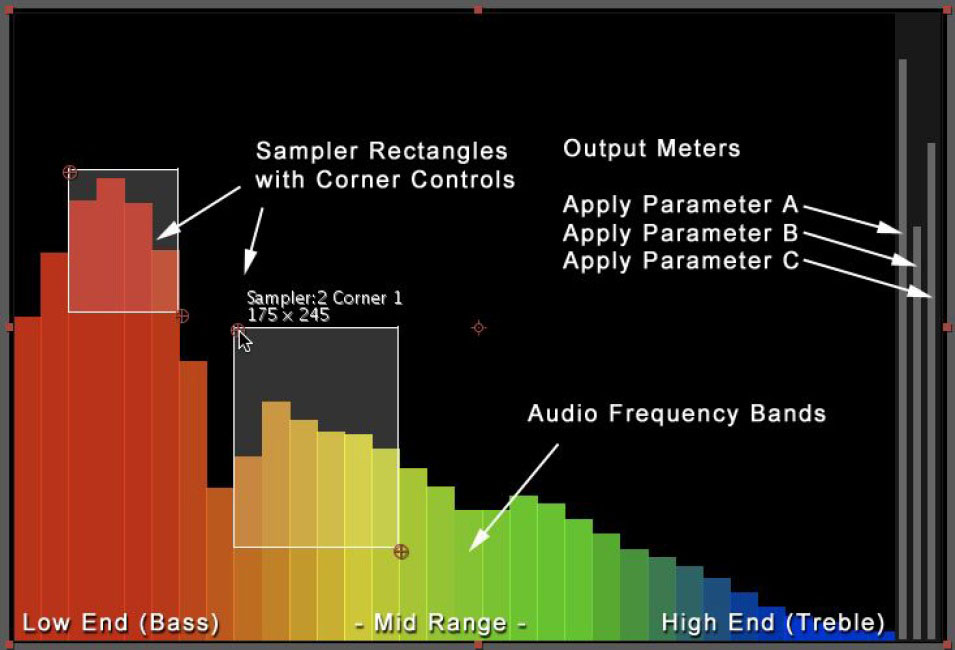
  • Use the on-screen (Corner 1 and Corner 2) position points to place the sampler rectangle so it covers the area in which the audio event occurs, trying as much as possible to exclude spectrum band activity which is not part of the audio event.

  • PTR with audio again, listening carefully and watching the sampler’s output meter (the white band on the far right edge of the graph) to see if the sampler is picking up the audio event well enough to use for influencing the parameter. If necessary, pause PTR playback and re-adjust the sampler rectangle, PTR with audio again, readjust samplers and so on.

  • Note: Falloff and Delay are parameters that relate to how Beat Reactor affects parameters (discussed in the next section of this document), but their effects are also reflected in the graph display output meters. For more direct and accurate audio visualization, disable these parameters by setting Delay amount to 0 and setting Falloff to Unused during the process of placing Samplers to isolate audio events on the graph.

Beat reactor Integrated 2


Adjusting Apply Options

The Beat Reactor group can influence up to 3 different parameters using the Apply Parameter popups (A, B, and C) and the corresponding Apply Options (A, B, and C). Each active Apply Parameter will be represented by a sampler rectangle on the graph.

Once Samplers have been placed so that they do a satisfactory job of targeting the audio events which will be used to influence the parameter(s), then it is possible to make adjustments to the Apply Options.

  • The Effect on Parameter popup contains some fundamental choices about how Beat Reactor affects the parameter.
  • Replace Value will replace any parameter value already set on the parameter.
  • Add to Value will take the value derived from the samplers and add it to any parameter value already assigned to the parameter. This can be used to deviate below and above a specific value (by defining the range so both positive and negative values are added to the current value).
  • Subtract from Value will take the value derived from the samplers and subtract it from any parameter value already assigned to the parameter.
  • Output Range, Output Min, and Output Max determine the numeric range within which the Beat Reactor will influence the parameter. In this case, Output Min does not need to be a lower number than Output Max. Output Min is the value mapped to the lowest (quietest) part of the output meter and Output Max is the value mapped to the highest (loudest) part of the output meter.
  • Apply Strength % allows for scaling the influence of the Beat Reactor on the parameter. Besides offering a quick way to increase or reduce the Beat Reactor influence, it provides a convenient way to animate (fade) the influence of the Beat Reactor on the parameter up or down over time.
  • Falloff and Falloff Time offer options for creating different behaviors for the Beat Reactor influence immediately following the sampled audio event.
  • Unused (Immediate) means there is no falloff beyond whatever is dictated by the sampled audio event.
  • Linear creates a falloff where the animation curve would appear as a straight line.
  • Quadratic Hard creates a falloff that starts a bit faster and eases toward the end of the falloff period.
  • Quadratic Soft creates a falloff that eases at the peak and accelerates toward end of the falloff period.
  • Sustain maintains the highest value within that occurrence of the audio event for the duration.
  • Build Up to Max keeps adding to the value (integrated over the audio event period), up to the maximum value in the graph. With this falloff type, a large Falloff Time value will build up slower than a short Falloff Time.
  • Build Up Indefinitely uses the Falloff Time to determine the time span over which one unit of build up is calculated and then builds up the value based on that.
  • Falloff Time determines the duration of the falloff in seconds.
  • Propagation Mode and Propagation Time ; the integrated Beat Reactor in the BCC Pin Art 3D and BCC Particle Array 3D includes a unique feature that allows for having the influence of the audio propagate through the particles in 3D space over time. Propagation Mode determines the starting point and direction of the propagation and Propagation Time determines how long it takes (in seconds) for the propagation to move from it’s starting point till it is completes within the particle array.

The Sampler popup menu includes options determining the sampler’s mode.

  • Box Percentage mode finds the percentage of the sampler box area that is filled by the spectrum bands and fills that same percentage of the output meter.
  • Max Frequency mode compares spectrum bands and finds the one that is filling the greatest area of the sampler and then finds the percentage full on only that band (as if the rectangle were only as wide as that band) and fills that same percentage of the output meter.
  • Toggle ON/OFF mode will fill the whole output meter (Output Max value) if there is any piece of spectrum band within the sampler rectangle (and go straight to an empty meter as soon as there is no spectrum band within the rectangle).
  • Link to Sampler A: The Sampler popups in the Apply Options B and C subgroups include an additional choice to have Sampler B and C Link to Sampler A. When this is chosen, B and C maintain their own individual options (Range, Falloff, etc.) but will use the sampler rectangle from Apply A and derive the animation from that area of the spectrum graph.

The Sampler Corner parameters are coordinate parameters for the sampler rectangles’ placement corners (these parameters are usually adjusted using the on-screen position point since they are placed in relation to the audio spectrum bands).

The Audio Spectrum Options group contains options for adjusting how the spectrum graph visualizes the audio.

  • Freq Resolution determines how many distinct bands are used to represent the frequencies included in the graph. It is sometimes useful to increase the resolution in order to visualize and more accurately sample a specific audio event.
  • Scale (%) can be used to adjust the vertical scale of all the bands in the graph (scaling them toward the top of the graph). For audio with lower levels it is often useful to boost the scale a bit so it better fills the graph area. Sub-Bass, Bass, Mid-Range, and Treble (%) offer the same functionality for individual areas of the spectrum (with Scale % acting as a master control).
  • Low Cutoff dB determines what level is used as the cutoff point at the bottom of the graph.
  • Min and Max Freq (Hz) determine the frequency range displayed in the graph.
  • Smoothness (%) makes the graph smoother by averaging out the values of neighboring frequency bands. This can be useful for more easily visualizing broader patterns in the audio, although smaller smoothness values offer more precise isolation of sound.

The Show Graph popup menu includes options for how the graph displays ;

  • Only in Draft Mode will result in the graph being displayed only when the AE layer’s Quality switch is set to Draft (the Graph will not display when the layer is set to Best quality).
  • When set to Yes the graph will be displayed as long as a layer has been deselected in the Sound Layer popup menu.
  • When set to No the graph will not be displayed.
  • When set to With Black Background the graph will be displayed with a black background as long as a layer has been selected in the Sound Layer popup menu.

The Graph Options group includes controls for Graph Opacity, and Corner controls for the graph that allow for changing the graph’s position and size within the frame. Since the white sampler rectangles do not move or scale along with the graph when using these corner controls, it is best to re-position / re-scale the graph BEFORE setting the sampler rectangles.

Using External Audio Files (In all hosts besides Adobe Aftereffects workflow):

  • Since non-Adobe Aftereffects hosts video plugin cannot directly access audio from their timeline, the workflow for using Beat Reactor in these hosts involves directing the plugin to an external audio file on your system. The audio file must be an AIFF (Audio Interchange File Format) file using the .aif or .aiff file extension. AIFF files of various sample rates and bit depths are supported. Commonly the audio file will contain the same audio that is present in 1 or more tracks of the host timeline during the duration of the BCC effect to create the appearance of some sort of synchronicity between the image and sound. Therefore, once you have decided to use the Beat Reactor, often the first step is to mark an in and an out in the Avid timeline around the audio you want to use in the Beat Reactor and export it out of these hosts as an AIFF file.
  • To use Beat Reactor it is necessary to first select the audio file including the audio you wish to use for influencing effect parameters. After checking the Enable Beat Reactor checkbox, a message is displayed in the effect output that looks like the image below.
Beat reactor Integrated 3

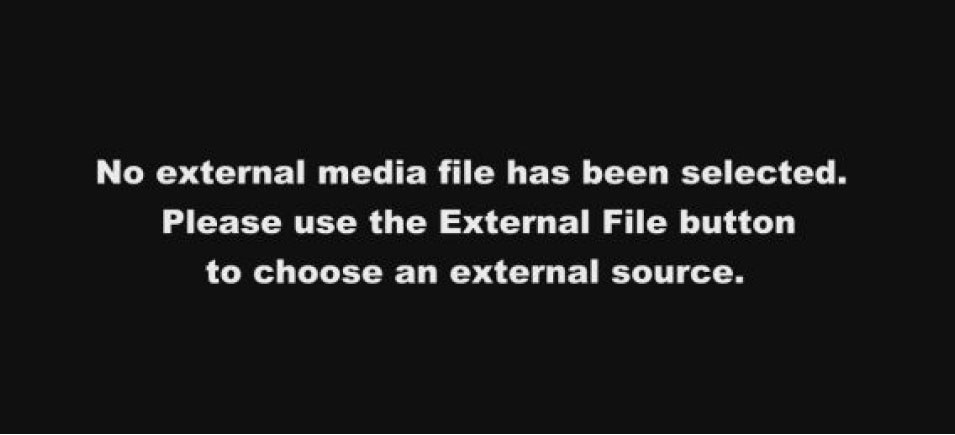
This message means that it is necessary to click on the External File button to open the file selection dialogue that allows for selecting the AIFF file

Beat reactor Integrated 4

Once an AIFF file has been selected, the audio graph will display vertical bars representing the audio levels within different frequencies, and it is possible to enable an Apply Parameter and begin adjusting the Beat Reactor.


Category:

BCC Film Style

BCC Particles

BCC Color & Tone

BCC Perspective

BCC Perspective

BCC Licensing

BCC Obsolete

BCC Key & Blend

BCC Obsolete

Nested Subgroup

BCC Art Looks

BCC Licensing

BCC Time

Nested Subgroup

BCC Image Restoration

BCC Transitions

BCC Blur & Sharpen

BCC Transitions

BCC Obsolete

BCC Textures

BCC Color & Tone

BCC Image Restoration

BCC Warp

BCC Art Looks

BCC Transitions

BCC Art Looks

BCC Art Looks

BCC Stylize

BCC Textures

BCC Art Looks

BCC Transitions

BCC Key & Blend

BCC Key & Blend

BCC Textures

BCC Textures

BCC Color & Tone

BCC Stylize

BCC Color & Tone

BCC Color & Tone

BCC Obsolete

BCC Color & Tone

BCC Stylize

BCC Transitions

BCC Particles

Uncategorized

Uncategorized

Nested Subgroup

BCC Key & Blend

BCC Key & Blend

BCC Transitions

BCC Match Move

BCC Match Move

BCC Color & Tone

BCC Transitions

BCC Transitions

BCC Transitions

BCC Transitions

BCC Transitions

BCC Perspective

BCC Warp

BCC Transitions

BCC Perspective

BCC Stylize

BCC Transitions

BCC Obsolete

BCC Film Style

BCC Obsolete

BCC Blur & Sharpen

BCC Warp

BCC Stylize

BCC Image Restoration

BCC Image Restoration

BCC Image Restoration

BCC Perspective

BCC Perspective

BCC Key & Blend

BCC Stylize

BCC Lights

Uncategorized

BCC Stylize

BCC 3D Objects

BCC 3D Objects

BCC 3D Objects

BCC Film Style

BCC Transitions

BCC Film Style

BCC Perspective

BCC Blur & Sharpen

BCC Film Style

BCC Obsolete

BCC Obsolete

BCC Film Style

BCC Obsolete

BCC Obsolete

BCC Image Restoration

BCC Transitions

BCC Textures

BCC Browser

BCC Blur & Sharpen

BCC Lights

BCC Lights

BCC Lights

BCC Stylize

BCC Obsolete

Nested Subgroup

BCC Textures

BCC Transitions

BCC Stylize

BCC Art Looks

BCC Color & Tone

BCC Color & Tone

BCC Time

BCC Time

BCC Transitions

BCC Lights

BCC 3D Objects

BCC Stylize

BCC Obsolete

BCC Transitions

BCC Image Restoration

BCC Transitions

BCC Lights

BCC Obsolete

BCC Transitions

BCC Transitions

BCC Transitions

BCC Transitions

BCC Blur & Sharpen

BCC Obsolete

BCC Color & Tone

BCC Lights

BCC Transitions

BCC Obsolete

BCC Lights

BCC Transitions

BCC Key & Blend

BCC Obsolete

BCC Lights

BCC Key & Blend

BCC Key & Blend

BCC Transitions

BCC Time

BCC Image Restoration

BCC Key & Blend

BCC Film Style

BCC Match Move

BCC Key & Blend

BCC Key & Blend

BCC Art Looks

BCC Stylize

BCC Textures

BCC Warp

BCC Stylize

BCC Blur & Sharpen

BCC Image Restoration

Nested Subgroup

Nested Subgroup

Nested Subgroup

Nested Subgroup

Nested Subgroup

Nested Subgroup

Nested Subgroup

Nested Subgroup

Nested Subgroup

BCC Stylize

BCC Transitions

BCC Transitions

BCC Color & Tone

BCC Obsolete

BCC Textures

BCC Image Restoration

BCC Time

BCC Image Restoration

BCC Particles

Uncategorized

Uncategorized

Uncategorized

Uncategorized

BCC Perspective

BCC Perspective

BCC Particles

BCC Particles

BCC Particles

BCC Transitions

BCC Particles

BCC Art Looks

BCC Particles

Nested Subgroup

Nested Subgroup

BCC Image Restoration

Nested Subgroup

BCC Warp

BCC Art Looks

BCC Time

BCC Key & Blend

BCC Key & Blend

BCC Stylize

BCC Transitions

BCC Blur & Sharpen

BCC Blur & Sharpen

BCC Transitions

BCC Particles

BCC Lights

BCC Transitions

BCC Lights

BCC Lights

BCC Lights

BCC Lights

BCC Lights

BCC Lights

BCC Lights

BCC Lights

BCC Transitions

BCC Stylize

BCC Image Restoration

BCC Image Restoration

BCC Textures

BCC Lights

BCC Key & Blend

BCC Transitions

BCC Transitions

BCC Stylize

BCC Stylize

BCC Transitions

BCC Transitions

BCC Warp

BCC Transitions

BCC Textures

BCC Obsolete

BCC Color & Tone

BCC Stylize

BCC Stylize

BCC Obsolete

BCC Image Restoration

BCC Particles

BCC Particles

BCC Perspective

BCC Transitions

BCC Key & Blend

BCC Transitions

BCC Blur & Sharpen

BCC Lights

BCC Art Looks

BCC Lights

BCC Obsolete

BCC Textures

BCC Textures

BCC Obsolete

BCC Transitions

BCC Time

BCC Transitions

BCC Art Looks

BCC Transitions

BCC Time

BCC 3D Objects

BCC Time

BCC Time

BCC Color & Tone

BCC Transitions

BCC Warp

BCC Warp

BCC Transitions

BCC Film Style

BCC Key & Blend

BCC 3D Objects

BCC Blur & Sharpen

BCC Image Restoration

Uncategorized

BCC Transitions

BCC Warp

BCC Textures

BCC Time

BCC Stylize

BCC Warp

BCC Color & Tone

BCC Film Style

BCC Transitions

BCC VR

BCC VR

BCC VR

BCC VR

BCC VR

BCC Warp

BCC Art Looks

BCC Transitions

BCC Warp

BCC Textures

BCC Particles

BCC Image Restoration

BCC Match Move

BCC Textures

BCC Textures

BCC Obsolete

BCC Obsolete

BCC Obsolete

BCC Blur & Sharpen

BCC Image Restoration

BCC Blur & Sharpen

BCC Transitions

BCC Blur & Sharpen

BCC Transitions

BCC Blur & Sharpen

BCC Key & Blend

BCC Transitions

BCC Transitions

BCC Blur & Sharpen

BCC Transitions

BCC Transitions

BCC Color & Tone

BCC Film Style

BCC Transitions

BCC Film Style

BCC Film Style

BCC Color & Tone

BCC Color & Tone

BCC Lights

BCC Transitions

BCC Image Restoration

BCC Transitions

BCC Stylize

BCC Transitions

BCC Transitions

BCC Blur & Sharpen

BCC Transitions

BCC Blur & Sharpen

BCC Transitions

BCC Film Style

BCC Stylize

BCC Lens

BCC Lights

BCC Color & Tone

BCC Film Style

BCC Art Looks

BCC Lens

BCC Optical Diffusion

BCC Lights

BCC Lens

BCC Grads and Tints

BCC Art Looks

BCC Key & Blend

BCC Art Looks

BCC Grads and Tints

BCC Grads and Tints

BCC Film Style

BCC Film Style

BCC Image Restoration

BCC Image Restoration

BCC Color & Tone

BCC Lens

BCC Optical Diffusion

BCC Blur & Sharpen

BCC Color & Tone

BCC Optical Diffusion

BCC Optical Diffusion

BCC Grads and Tints

BCC Key & Blend

BCC Color & Tone

BCC Lights

BCC Film Style

BCC Optical Diffusion

BCC Optical Diffusion

BCC Grads and Tints

BCC Lights

BCC Lights

BCC Lights

BCC Color & Tone

BCC Optical Diffusion

BCC Art Looks

BCC Color & Tone

BCC Key & Blend

BCC Lights

BCC Art Looks

BCC Color & Tone

BCC Lights

BCC Lens

BCC Lights

BCC Lights

BCC Film Style

BCC Color & Tone

BCC Key & Blend

BCC Optical Diffusion

BCC Grads and Tints

BCC Optical Diffusion

BCC Art Looks

BCC Key & Blend

BCC Key & Blend

BCC Lights

BCC Grads and Tints

BCC Color & Tone

BCC Optical Diffusion

BCC Lens

BCC Grads and Tints

BCC Lights

BCC Lights

BCC Lights

BCC Color & Tone

BCC Grads and Tints

BCC Color & Tone

BCC Optical Diffusion

BCC Grads and Tints

BCC Optical Diffusion

BCC Grads and Tints

BCC Lights

BCC Grads and Tints

BCC Textures

BCC Film Style

BCC Grads and Tints

BCC Perspective

BCC Transitions

BCC Lens

BCC Art Looks

Title Studio

Title Studio

Title Studio

Title Studio

Title Studio

Title Studio

Title Studio

BCC 3D Objects

Tutorial

Tutorial

Tutorial

Tutorial

Tutorial

Tutorial

Tutorial

Tutorial

Tutorial

Tutorial

Tutorial

Title Studio

Title Studio

Title Studio

Title Studio

Title Studio

Title Studio

Title Studio

Title Studio

Title Studio

Title Studio

Title Studio

Title Studio

Tutorial

Title Studio

Title Studio

Title Studio

Title Studio

Title Studio

Title Studio

Title Studio

Title Studio

Title Studio

Tutorial

Effect:
BCC+X-Ray
BCC+Wide Angle Lens
BCC+Video Glitch Dissolve
BCC+Transform
BCC+Tint
BCC+Three Strip
BCC+Textures
BCC+Sunset
BCC+Streaks
BCC+Split Tone
BCC+Split Field
BCC+Skin Tone
BCC+Silk
BCC+Shadows/Highlights
BCC+Sepia
BCC+Selective Saturation
BCC+ReLight
BCC+Reflector
BCC+Rays
BCC+Radial Tint
BCC+Radial Exposure
BCC+Rack Focus
BCC+Polarizer
BCC+Photographic
BCC+Overexpose
BCC+Optical Dissolve
BCC+Non-Additive Mix
BCC+Night Vision
BCC+Net
BCC+ND Gradient
BCC+Mist
BCC+Math Composite
BCC+Low Contrast
BCC+Looks
BCC+Light
BCC+Lens Flare
BCC+Lens Distortion
BCC+Key Light
BCC+Kelvin
BCC+Infrared
BCC+Ice Halos
BCC+Holdout Composite
BCC+High Contrast
BCC+Harris Shutter
BCC+Halo
BCC+Grade
BCC+Glow Edges
BCC+Glow Darks
BCC+Glow
BCC+Gels
BCC+FX-Editor
BCC+Frost
BCC+Fog
BCC+Film Stocks
BCC+Eye Light
BCC+Enhancing
BCC+Edge Composite
BCC+Dual Gradient
BCC+Double Fog
BCC+Diffusion
BCC+Develop
BCC+Detail
BCC+Depth of Field
BCC+DeFringe
BCC+Defog
BCC+DeBlock
BCC+DeBand
BCC+Day for Night
BCC+Cross Processing
BCC+Colorize Gradient
BCC+Color Spot
BCC+Color Shadow
BCC+Color Paste
BCC+Color Infrared
BCC+Color Gradient
BCC+Chromatic Aberration
BCC+Chroma Bands
BCC+Center Spot
BCC+Camera Shake
BCC+Borders
BCC+Bleach Bypass
BCC+Black and White
BCC+Ambient Light
BCC+ Vignette
BCC+ Video Glitch
BCC+ Two Strip
BCC+ Spin Blur Dissolve
BCC+ Smear Blur
BCC+ Rays Dissolve
BCC+ Radial Blur
BCC+ Rack Focus Dissolve
BCC+ Prism Dissolve
BCC+ Prism
BCC+ Multi-Star Dissolve
BCC+ Magic Sharp
BCC+ Light Leaks Dissolve
BCC+ Light Leaks
BCC+ Haze
BCC+ Fluorescent
BCC+ Flashing
BCC+ Film Grunge
BCC+ Film Glow Dissolve
BCC+ Film Glow
BCC+ F-Stop
BCC+ Dissolve
BCC+ Directional Blur Dissolve
BCC+ Directional Blur
BCC+ Cross Zoom Dissolve
BCC+ Crash Zoom Dissolve
BCC+ Composite
BCC+ Channel Blur YUV
BCC+ Channel Blur Dissolve
BCC+ Channel Blur
BCC+ Camera Shake Dissolve
BCC+ Blur
BCC+ Beauty Studio
BCC Z-Blur
BCC Z Space III
BCC Z Space II
BCC Z Space I
BCC Wooden Planks
BCC Wood Grain
BCC WitnessProtection
BCC Wire Remover
BCC Wild Cards
BCC Weave
BCC Wave
BCC Water Waves Dissolve
BCC Water Color
BCC Warp
BCC VR Sharpen
BCC VR Reorient
BCC VR Insert
BCC VR Flicker Fixer
BCC VR Blur
BCC Vignette Wipe
BCC Vignette
BCC VideoScope
BCC Video Morph
BCC Video Glitch
BCC Velocity Remap
BCC Veined Marble
BCC Vector Displacement
BCC Vector Blur Dissolve
BCC User Guide
BCC UpRez
BCC Unsharp Mask
BCC Type On Text
BCC Two Way Key
BCC Two Strip Color
BCC Twister
BCC Twirl
BCC Turbulence
BCC Tritone Dissolve
BCC Tritone
BCC Trails Basic
BCC Trails
BCC Title Studio
BCC Time Displacement
BCC Tile Wipe
BCC Tile Mosaic
BCC Textured Wipe
BCC Temporal Blur
BCC Swish Pan
BCC Super Blend
BCC Steel Plate
BCC Stars
BCC Star Matte
BCC Stage Light
BCC Spray Paint Noise
BCC Spotlight
BCC Spiral Blur
BCC Spin Blur Dissolve
BCC Spill Remover
BCC Sphere Transition
BCC Sphere
BCC Sparks
BCC Snow
BCC Smooth Tone
BCC Sequencer
BCC Scatterize
BCC Scanline
BCC Safe Colors
BCC Rough Glow
BCC Rock
BCC Ripple Dissolve
BCC Ripple
BCC Rings Wipe
BCC Ribbon Wipe
BCC RGB Pixel Noise
BCC RGB Edges
BCC RGB Displacement Dissolve
BCC RGB Blur Dissolve
BCC RGB Blend
BCC Reverse Spotlight
BCC Reptilian
BCC Remover
BCC Reframer
BCC Reflection
BCC Rectangular Wipe
BCC Rays Wedge
BCC Rays Textured
BCC Rays Streaky
BCC Rays Ripply
BCC Rays Ring
BCC Rays Radiant Spotlight
BCC Rays Radiant Edges
BCC Rays Puffy
BCC Rays Dissolve
BCC Rays Cartoon
BCC Rain
BCC Radial Wipe
BCC Radial Blur
BCC Pyramid Blur
BCC Prism Dissolve
BCC Prism
BCC Primatte Studio
BCC Presets
BCC Premult
BCC Preferences
BCC Posterize Time
BCC Posterize
BCC Polar Displacement
BCC PixelChooser – Legacy
BCC Pixel Fixer
BCC Pixel Chooser
BCC Pinning Controls
BCC Pin Art 3D
BCC Pencil Sketch
BCC Particle System
BCC Particle Illusion Dissolve
BCC Particle Illusion
BCC Particle Emitter 3D
BCC Particle Array 3D
BCC Pan And Zoom
BCC Page Turn
BCC Overview in Resolve
BCC Overview in FCP
BCC Overview in Avid
BCC Overview in Adobe
BCC Organic Strands
BCC Optical Stabilizer
BCC Optical Flow
BCC Noise Reduction
BCC Noise Map 2
BCC Noise Map
BCC MultiTone Mix
BCC Multi Stripe Wipe
BCC Multi Stretch Wipe
BCC Multi Shadow
BCC Motion Tracker Vegas
BCC Motion Tracker Resolve
BCC Motion Tracker Red
BCC Motion Tracker PRM
BCC Motion Tracker Motion
BCC Motion Tracker FCP
BCC Motion Tracker Avid
BCC Motion Tracker AE
BCC Motion Tracker
BCC Motion Key
BCC Motion Blur
BCC Mosaic
BCC Morph
BCC Mixed Colors
BCC Misalignment
BCC Median
BCC Matte Cleanup
BCC Matte Choker
BCC Match Move
BCC Match Grain
BCC Make Alpha Key
BCC Magic Sharp
BCC Looper
BCC Linear Wipe
BCC Linear Luma Key
BCC Linear Color Key
BCC Lightning
BCC Light Zoom
BCC Light Wrap
BCC Light Wipe
BCC Light Sweep
BCC Light Matte
BCC Light Leaks Dissolve
BCC Light Leaks
BCC Levels Gamma
BCC Lens Transition
BCC Lens Shape
BCC Lens Flash
BCC Lens Flare Spiked
BCC Lens Flare Round
BCC Lens Flare Dissolve
BCC Lens Flare Advanced
BCC Lens Flare 3D
BCC Lens Distortion Wipe
BCC Lens Correction
BCC Lens Blur Dissolve
BCC Lens Blur
BCC LED
BCC Layer Deformer
BCC Laser Beam
BCC Kaleida Dissolve
BCC Jitter Basic
BCC Jitter
BCC Invert Solarize
BCC Hue-Sat-Lightness
BCC Halftone
BCC Grunge
BCC Grid Wipe
BCC Granite
BCC Gradient
BCC Glow Matte
BCC Glow Alpha Edges
BCC Glitter
BCC Glint
BCC Glare
BCC Gaussian Blur
BCC FX Browser
BCC Fractal Noise
BCC Flutter Cut
BCC Flicker Fixer
BCC Fire
BCC Film Process
BCC Film Grain
BCC Film Glow Dissolve
BCC Film Glow
BCC Film Damage
BCC Fast Lens Blur
BCC Fast Flipper
BCC Fast Film Process
BCC Fast Film Glow Dissolve
BCC Fast Film Glow
BCC FAQ
BCC Extruded Text
BCC Extruded Spline
BCC Extruded EPS
BCC Emboss
BCC Effects List
BCC Edge Lighting
BCC Edge Grunge
BCC Edge Cleaner
BCC DVE Basic
BCC DVE
BCC Dv Fixer
BCC Dust and Scratches
BCC Dropout Fixer
BCC Drop Shadow
BCC Displacement Map
BCC Directional Blur
BCC DeNoise
BCC Deinterlace
BCC DeGrain
BCC Damaged TV Dissolve
BCC Damaged TV
BCC Cylinder
BCC Curl Dissolve
BCC Curl
BCC Cube
BCC Cross Zoom
BCC Cross Melt
BCC Cross Glitch
BCC Criss-Cross Wipe
BCC Crash Zoom Dissolve
BCC Correct Selected Color
BCC Corner Pin Studio
BCC Corner Pin
BCC Composite Dissolve
BCC Composite Choker
BCC Composite
BCC Compare Mode
BCC Common Controls - Avid
BCC Common Controls
BCC Comet
BCC Colorize Glow Dissolve
BCC Colorize Glow
BCC Colorize
BCC Color Palette
BCC Color Match
BCC Color Correction
BCC Color Choker
BCC Color Balance
BCC Clouds
BCC Cloth
BCC Chroma Key Studio
BCC Chroma Key
BCC Checker Wipe
BCC Charcoal Sketch
BCC Caustics
BCC Cast Shadow
BCC Cartooner
BCC Cartoon Look
BCC Burnt Film
BCC Bump Map
BCC Bulge
BCC Broadcast Safe
BCC Brightness-Contrast
BCC Brick
BCC Boost Blend
BCC Blur Dissolve
BCC Blur
BCC Blobs Wipe
BCC Beauty Studio
BCC Beat Reactor Integrated
BCC Beat Reactor
BCC AVX Licensing
BCC Artists Poster
BCC Apply Modes
BCC Alpha Spotlight
BCC Alpha Process
BCC Alpha Pixel Noise
BCC AE Licensing
BCC 3D Image Shatter
BCC 3D Extruded Image Shatter
BCC 3 Way Color Grade
BCC 2D Particles
BCC+ Atmospheric Glow