S_LensFlare
Description
Renders a lens flare image over the image, aligning various flare elements between the hotspot and pivot locations.
The S_LensFlare filter comes from the Emmy award winning Boris FX Sapphire filter set.
Category
Light.
Controls
Presets
To select a preset, pick one from the Presets window.
Edit Lens
Opens the Flare Designer where you can select Lens Flare presets and modify their elements.
See the Flare Designer for more information.
Scale Widths
Scales the sizes of all the flare elements.
Rel Heights
Scales the vertical dimension of all the flare elements, making them elliptical instead of circular.
Blur Flare
If positive, the flare image is blurred by this amount before being combined with the image.
Hotspot
The location of the brightest spot in the flare.
Pivot
The elements of the flare will be in a line between the Hotspot and the Pivot locations.
Brightness
Scales the brightness of all the flare elements.
Color
Scales the color of all flare elements.
Gamma
Increasing gamma brightens the flare and especially boosts the darker elements.
Saturation
Scales the color saturation of the flare elements. Increase for more intense colors. Set to 0 for a monochrome lens flare.
Hue Shift
Shifts the hue of the flare in revolutions from red to green to blue to red.
Rays
Rays Brightness
Scales the brightness of the ray elements only.
Rays Rotate
Rotates the ray elements of the lens flare, if any, in counterclockwise degrees.
Rays Num Scale
Increases or decreases the number of rays.
Rays Length
Adjusts the length of the rays without changing their thickness or changing the size of the other flare elements.
Rays Thickness
Adjusts the thickness of the individual rays within the flare.
Hotspot
Hotspot Bright
Scales the brightness of the hotspot elements only.
Hotspot Color
Scales the color of the hotspot elements only.
Other
Other Brightness
Scales the brightness of all flare elements that are not at the hotspot location.
Other Color
Scales the color of all flare elements that are not at the hotspot location.
Other Width
Scales the width of all flare elements that are not at the hotspot location.
Atmosphere
Atmosphere Amp
Atmosphere gives the effect of the flare shining through a dusty atmosphere and picking up light or getting shadowed. This parameter adjusts the amount, or amplitude of the atmospheric effect. 0 creates a smoother flare while higher values provide a more dirty look.
Atmosphere Freq
Controls the spatial frequency of the atmospheric noise. Turn this up higher to get finer details or turn down for broader overall variation.
Atmosphere Detail
Controls the amount of fine detail in the atmosphere simulation. Decrease to get smoother atmosphere or increase for a more crunchy, grainy look.
Atmosphere Seed
Used to initialize the random number generator for the atmospheric noise. The actual seed value is not significant, but different seeds produce different results and the same value should give a repeatable result.
Bg Brightness
Scales the brightness of the image before combining with the flare. If 0, the result will contain only the flare image over black.
Combine
Determines how the flare is combined with the image.
Screen
Performs a blend function which can help prevent overly bright results.
Add
Adds the flare to the image.
Flare Only
Renders only the flare with no background.
Tint Bg Whites
If this is enabled, the chroma of the flare is added only after the result is clamped to the maximum brightness. This allows the color of the flare image to still be visible even over bright white backgrounds. For the majority of images, there will be no observable difference.
Edge Triggers
Edge Width
Creates a trigger zone at the edge of the screen which affects the brightness and size of the flare. This parameter controls the width of the zone. Setting it to zero will disable Edge Triggers.
Edge Falloff
Controls the speed with which the intensity of the trigger decreases when moving away from the edge. A value of 1 results in a linear ramp. Values greater than one result in a steeper initial drop which gradually levels out. Values less than one result in a slope that starts gradually and gets steeper at the end.
Shift Out
Shifts the trigger zone outward from the edge of the screen, placing the peak off−screen. Negative values will shift the trigger zone inward toward the center of the image.
One Way
If this box is checked, the trigger will stay at maximum intensity when the Hotspot moves off−screen instead of ramping back down as it moves farther from the edge.
Edge Scale Brightness
Scales the Brightness by this amount when the trigger is at peak intensity. For example, a value of 3 will cause the flare to ramp up to 3 times its normal brightness as it passes through the trigger zone. If less than 1, the trigger will dim the flare instead of brightening it.
Edge Scale Widths
Scales the width of the flare by this amount when the trigger is at peak intensity. For example, a value of 3 will cause the flare to expand to 3 times its normal size as it passes through the trigger zone. If less than 1, the trigger will shrink the flare instead of growing it.
Show Edge Zones
Overlays the output with a grayscale image which shows the location intensity of the Edge Triggers.
Center Triggers
Center Radius
Creates a trigger zone centered on the Pivot which affects the brightness and size of the flare. This parameter controls the radius of the zone. Setting it to zero will disable Center Triggers.
Center Falloff
Controls the speed with which the intensity of the trigger decreases when moving away from the edge. A value of 1 results in a linear ramp. Values greater than one result in a steeper initial drop which gradually levels out. Values less than one result in a slope that starts gradually and gets steeper at the end.
Center Scale Brightness
Scales the Brightness by this amount when the trigger is at peak intensity. For example, a value of 3 will cause the flare to ramp up to 3 times its normal brightness as it passes through the trigger zone. If less than 1, the trigger will dim the flare instead of brightening it.
Center Scale Widths
Scales the width of the flare by this amount when the trigger is at peak intensity. For example, a value of 3 will cause the flare to expand to 3 times its normal size as it passes through the trigger zone. If less than 1, the trigger will shrink the flare instead of growing it.
Show Center Zone
Overlays the output with a grayscale image which shows the location intensity of the Center Trigger.
Show Scale Widths
Enables/disables the on-screen control for adjusting the Scale Widths and Rel Heights parameters.
Show Hotspot
Enables/disables the on-screen control for adjusting the Hotspot parameter.
Show Pivot
Enables/disables the on-screen control for adjusting the Pivot parameter.
Flare Designer
The Flare Designer lets you completely customize a lens flare. You can add or remove elements, copy them, customize how each element looks, and even how it reacts to the center or edge of the image. You can also interactively move the flare around to see how it will look as it moves.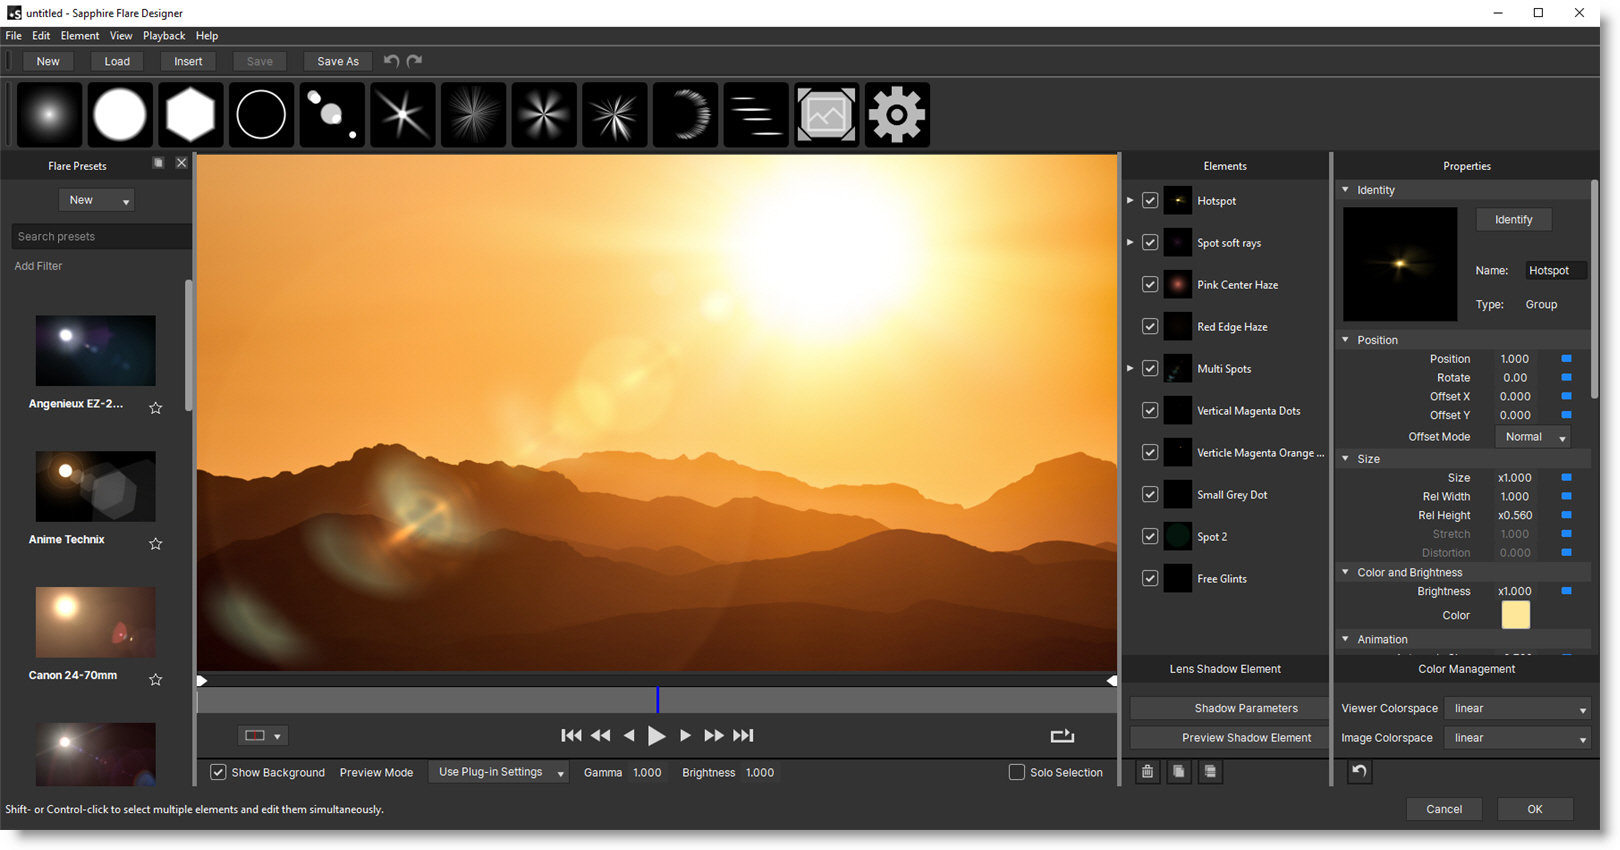
All the windows of the Flare Designer are movable, so you can adjust the user interface itself to suit your work flow. The main windows are the Viewer, where you see the flare you're working on, the Elements window which lists all the elements of the flare, and the Properties window, which lets you adjust the properties of the currently selected element or elements. There's also a toolbar of element templates at the top.
Note: Clicking Edit Lens opens the Flare Designer.
Viewer
The Viewer displays the lens flare over the background or over black. Click and drag to move the flare around, adjust the gamma, or solo only selected elements. If you change the Preview Mode pop-up menu to Use Plug-in Settings, the Flare Designer imports the Lens Flare settings from Optics.
Elements
The Elements window shows you all the elements as thumbnails. If you hover over them, an overlay shows where they are in the Viewer. If you click on an element to select it, it flashes brighter in the Viewer to help you find it. Clicking Identify in the Properties window also flashes the element.
Add Elements
To add new elements, click an element template in the top toolbar. You can then rename the element, move it in the list by dragging and dropping, or hide it by unchecking the checkbox.
Delete Elements
To delete an element, select it and press Delete. There is full undo, so feel free to experiment.
Duplicate Elements
Duplicate an element using standard copy/paste operations. You can then adjust the copy's parameters in the Properties window.
Advanced Element Type
The Advanced Element Type has a number of controls and is very customizable, but it's recommended for advanced users only.
The standard element types get you most of the same looks with simpler parameters. Along with all the standard element types, you can import your own images to use as elements. Click the Add Texture icon to import an image file.
The image data will become part of the flare, so a reference to the original file is not needed.
To combine two flares into one, or add many elements at once, you can import another flare into your current flare. This will add all the other flare's elements to your current flare. You can also replace the current flare with a new one.
• To import and add to your flare, click the Insert button or File > Insert Lens.
• To import and replace, use the Load button or use File > Open Lens.
Properties
The Properties window is where you adjust all the details of a single element or multiple elements together. Use Shift+click or Ctrl/Cmd+click to select multiple elements.
Numeric Fields
Drag in the number field to increase or decrease the value. You can also click in the number field and type any value you want.
Color Controls
Color controls are just a swatch of color. Click to bring up a standard color picker.
Gradient
Some elements have a special gradient control.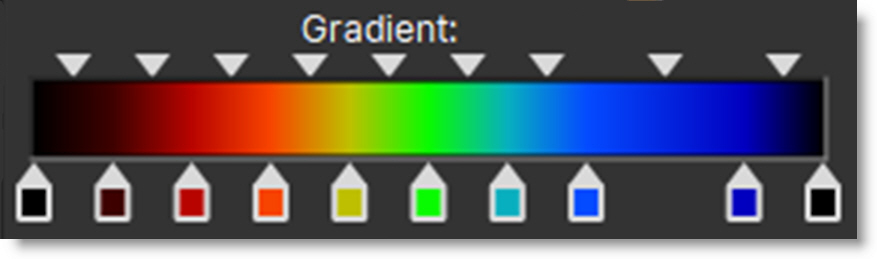
The stops are below the color swatch. You can drag them left and right to move them. Drag down to delete. Click in the color gradient to add a stop. Ctrl/Cmd+drag to stretch neighboring colors and Shift+drag to push neighboring colors. The triangles above the color gradient allow you to control the interpolation of the colors between stops.
Common Parameters
Different element types will have various parameters you can adjust, but you will find common ones below.
Position
The Position is where the element occurs along the line between the hotspot and pivot point. Position 1 is at the hotspot while 0 is at the pivot. Note that you don't have to stay in that range. You can use any value you like. Bigger than 1 will be past the hotspot, and less than zero will look like a reflection because it's on the other side of the pivot point.
Rotate
Rotates the element in degrees.
Size
How big the image is.
Rel Width / Rel Height
Use these to squash and stretch.
Reset
There's a Reset icon to the right of each parameter group as well as at the bottom of the Properties window to reset the current element(s) to default settings.