Pull-down Menus
Standalone only menu items are marked with an asterisk.
File
Open*
Opens an image from your computer’s hard drive. Camera RAW, TIFF, JPEG as well as Kodak® Cineon and DPX file formats used in motion picture and television production can all be used in Optics.
Note: Images can also be loaded by dragging a file from a browser window and dropping it into the Viewer.
Close*
Closes the image.
Recent Files*
The last five recently opened or saved files can be selected and opened here.
Save*
Saves the image in JPEG, PNG, or TIFF file formats.
When saving to the TIFF file format, you can optionally save the Optics setup (filter, layer and mask information) along with the final file. If you then open up the saved TIFF file, you are able modify the filter, layer and mask information.
Save As*
Saves the image as a new file.
Save Options
When using Save or Save As, once the file format and name are entered, the Save Options window opens that contains settings for the file format. The controls within this window will vary depending upon the file type.
Embed ICC Profile
The Embed ICC Profile option is enabled by default and embeds the current profile.
Save with Resize*
Resizes the image while saving. You can adjust the pixel dimensions, document size and resolution of an image.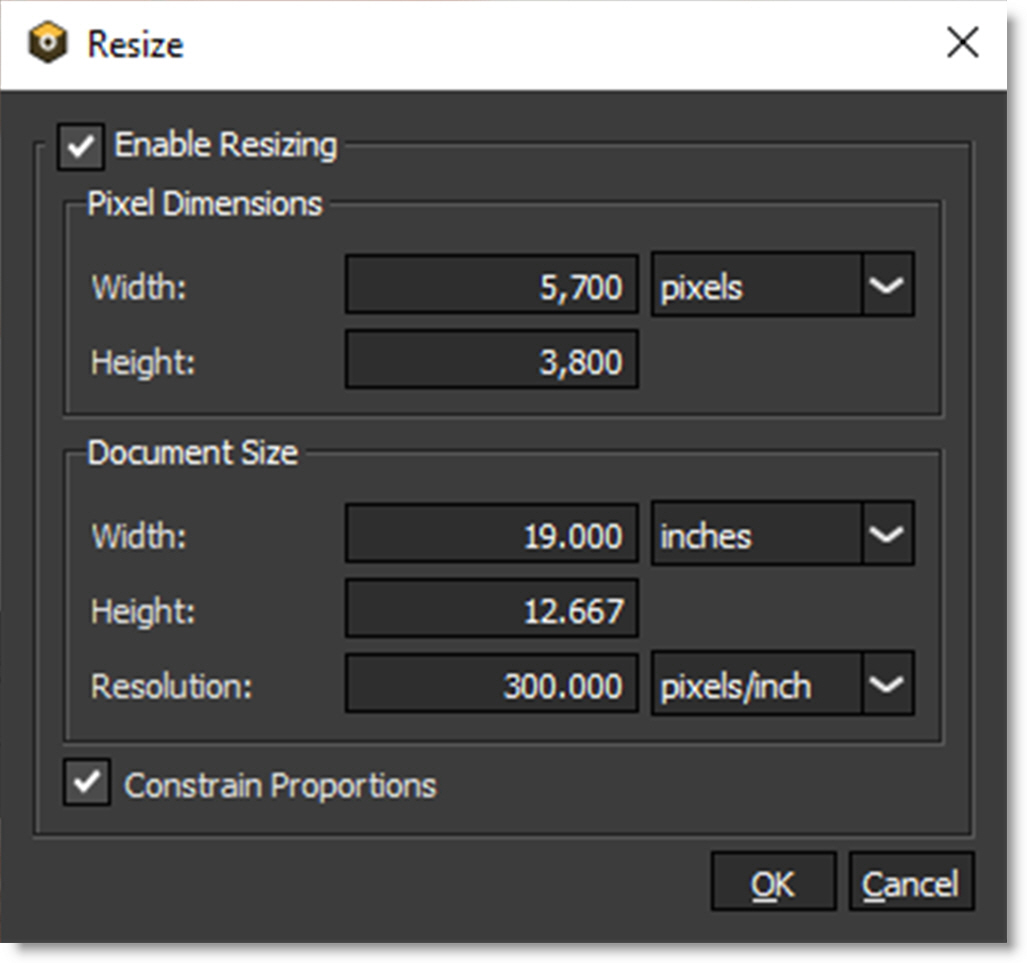
Enable Resizing
Activates resizing.
Pixel Dimensions
Sets the size of the image in terms of percent or pixels.
Width
Sets the width of the image.
Height
Sets the height of the image.
Unit of Measure
Percent
Uses percent as the unit of measure for the image dimensions.
Pixels
Uses pixels as the unit of measure for the image dimensions.
Document Size
If your image is ultimately targeted for print, it is useful to specify image size in terms of the printed dimensions and image resolution. Referred to as the document size, these two measurements determine the total pixel count and therefore the file size of the image.
Width
Sets the width of the image.
Height
Sets the height of the image.
Resolution
Sets the resolution of the document.
pixels/inch
Uses pixels/inch as the unit of measure for the resolution.
pixels/cm
Uses pixels/centimeters as the unit of measure for the resolution.
Unit of Measure
inches
Uses inches as the unit of measure.
cm
Uses centimeters as the unit of measure.
mm
Uses millimeters as the unit of measure.
points
Uses points as the unit of measure.
picas
Uses picas as the unit of measure.
Constrain Proportions
Constrain Proportions maintains the aspect ratio of the image. This parameter automatically changes the height as you change the width, and vice versa.
Setups
A Setup takes a snapshot of the filters and masks applied to your image in the Layers window. Setups can be saved and loaded and are independent of the image they were originally applied to. In addition, a Setup can be used to batch process a series of files in the Standalone.
Open Setup
Opens a previously saved Setup.
Save Setup (Alt-S)
Takes a snapshot of all filters and masks applied to your image in the Layers window and saves it as a Setup file. This Setup file can later be loaded to the same or a different image.
Recent Setups
The last five recently opened or saved Setups can be selected and opened here.
Batch*
Batch processes multiple files using the current setup or a previously saved Setup.
See Batch for more information.
Print*
Prints the current image and filter Setup.
Preferences
Preferences allow you to customize default settings.
Thumbnail Size
You can select whether the Optics Interface uses either a small or large thumbnail size. Medium thumbnails are the default.
Small
Small thumbnails are used in the Optics Interface.
Medium
Medium thumbnails are used in the Optics Interface.
Large
Large thumbnails are used in the Optics Interface.
Live Thumbnails
Determines whether or not the Sapphire filters use live or pre-generated thumbnails.
Preview Resolution
Defines the default working resolution. However, when your image is saved, Optics always processes at full size.
1K
Optics works at a maximum resolution of 1024 x 1024 pixels.
2K
Optics works at a maximum resolution of 2048 x 2048 pixels.
4K
Optics works at a maximum resolution of 4096 x 4096 pixels.
8K
Optics works at a maximum resolution of 8192 x 8192 pixels.
Full
Optics works at full resolution.
Note: Large Preview Resolutions take much longer to process when making parameter adjustments.
Preview Scaling
Point
Uses a lower quality scaling method when displaying the image in the Viewer. Point is more accurate when applying filters such as grain and sharpen, but when zooming in, the image will display “chunky” artifacts.
Bicubic
Uses a smooth scaling method when displaying the image in the Viewer. Bicubic can mask the effect of grain and sharpen filters because of its inherent smoothing, but doesn’t suffer from the Point methods chunkiness when zooming in.
GPU Rendering
Enables or disables GPU rendering.
Downsampling
At large preview sizes, interaction may slow down when adjusting filter parameters. To maintain fast processing during adjustments, you can enable Downsampling.
Adaptive
Automatically downsamples the image if required.
2:1
Automatically downsamples the image by a factor of 2.
4:1
Automatically downsamples the image by a factor of 4.
8:1
Automatically downsamples the image by a factor of 8.
DPX Interpretation*
Interpretation detects and sets whether DPX files are Logarithmic or Linear. Sometimes the program used to create the DPX files writes the wrong header information into the file causing Optics to think it is Logarithmic when it is Linear and vice versa. The controls below allow you to explicitly set whether or not the file is Logarithmic or Linear. Setting this preference will take effect the next time you load a file.
Auto
Automatically figures out whether the DPX file is Logarithmic or Linear.
Log
Manually sets the DPX file to Logarithmic.
Lin
Manually sets the DPX file to Linear.
Save Format*
Preselects the file type save format.
Auto
When saving, the image’s original file type is selected as the save format.
JPG
JPG is automatically selected when saving.
PNG
PNG is automatically selected when saving.
TIFF
TIFF is automatically selected when saving.
Effect Duration
Sets the duration of the timeline in the Particle Illusion user interface.
Cache Entries
Sets the number of cached Particle Illusion and S_LensFlare instances. 10 per filter is the default. Higher numbers result in more memory usage.
Parameter Groups
Default
The open/close state of parameter groups is set according to the default state specified by the filter.
Collapsed
Collapses all parameter groups.
Expanded
Expands all parameter groups.
Font Size
Sets the font size.
Preview Resolution Is Not Full Resolution
If the Viewer is not set to Full resolution, this preference displays a warning when entering Particle Illusion that states, “Preview resolution is not full resolution. Rendering from within Particle Illusion will not be full resolution.” If you plan on rendering an animated movie inside Particle Illusion, click Cancel and change the Preview Resolution to Full. Otherwise, the resolution in Particle Illusion will be whatever Optics was set at.
Apply Previous
Controls Photoshop’s behavior of using the previously applied Optics filters and masks. You can choose from Always, Ask and Never.
Always
When Optics opens, the filters and masks used in the last run are automatically applied to the image.
Ask
When Optics opens, you are asked if you want to apply the previous filters and masks.
Never
When Optics opens, no filters and masks are automatically applied.
Default Setup Path Next To Image
By default, the setup file save location is in the same folder as the source image. When this preference is disabled, the last folder used appears instead.
Save Setup With Image
Lightroom
Lightroom will retrieve the Optics setup information consisting of filters, layers and masks when the Save Setup With Image preference is enabled. To do this, you need to use “Edit Copy with Lightroom Adjustments” and render the result. If you then apply Optics to the newly rendered version and use “Edit Original”, your previous Optics setup will be shown and can be modified.
Photoshop
By default, Photoshop remembers your previous Optics setup consisting of filters, layers and masks and when you reapply Optics, they can all be modified.
Record Anonymous Usage Statistics
When enabled, anonymous usage statistics are recorded and transmitted to Boris FX.
Edit
Undo/Redo
Undo or redo operations.
Undo/Redo History
Undo/Redo has a history, so you can jump to any item in the history by picking it from the menu.
Delete
Deletes the selected filter.
Window
The Optics user interface is broken up into individual windows which can be opened or closed by selecting or deselecting them from the View menu. The following windows can be opened or closed:
Color Wheels
Open or closes the Color Correct Wheels window.
Console
Displays diagnostic information.
Copy to Clipboard
Copies the contents of the Console to the Clipboard.
Options
OpenGL
Displays the OpenGL version information.
Rendering Statistics
Displays rendering times.
Exif
Opens or closes the Exif window. See Exif for more information.
Filters
Opens or closes the Filters window. See Filters for more information.
Histogram
Opens or closes the Histogram window. See Histogram for more information.
Layers
Opens or closes the Layers window. See Layers for more information.
Metadata
Opens or closes the Metadata window which contains preset related information. See Metadata for more information.
Parameters
Opens or closes the Parameters window. See Parameters for more information.
Presets
Opens or closes the Presets window. See Presets for more information.
Variations
Opens or closes the Variations window. See Variations for more information.
Viewer
Opens or closes the Viewer. See the Viewer for more information.
Reset
Resets the window layout the next time Optics is started. This is useful if you have tweaked your windows beyond recognition.
Workspace
There are 3 preset workspaces that automatically arrange the interface windows into different configurations. Optics workspaces can be selected, saved or deleted. The current workspace displays a checkbox next to it in the menu.
Default
The interface is set to the default Optics workspace where the majority of windows are visible.
Edit
The Edit Layout shows the Viewer, Presets and Parameters windows.
View
The View Layout shows only the Viewer.
New
Creates a new workspace.
Delete
Deletes the current workspace.
Reset All
Resets all workspaces to the defaults.
Export
Exports the current workspaces.
Import
Imports saved workspaces.
Workspace Shortcuts
Shortcut | Action |
|---|---|
F2 | Selects the Default workspace |
F3 | Selects the Edit workspace |
F4 | Selects the View workspace |
Help
User Guide
Opens the Optics User Guide.
Help Shortcuts
Shortcut | Action |
|---|---|
F1 | Opens the Optics User Guide |
About
Shows the Optics version.
License
Opens the Deactivation Options window which has two choices: Internet Deactivate (Recommended) and Advanced Options.