Whether you're producing content for YouTube, a corporate presentation, or an advertisement, controlling your video's background can make a huge difference in its final look. A clean white background creates a minimalist and professional appearance, ideal for interviews, tutorials, and product showcases. On the other hand, removing a white background helps isolate subjects and integrate them into other visual elements or scenes.
Adobe Premiere Pro, while not traditionally known for heavy compositing, has tools that allow editors to both create white backgrounds and remove them when necessary. In this guide, you’ll learn step-by-step how to achieve both effects using native features within Premiere Pro.
How to Create White Background in Premiere Pro

Creating a white background in Premiere Pro can be achieved quickly and effectively, either for placing behind a keyed subject or as a neutral canvas for graphics and text.
-
Step 1: Create a White Color Matte
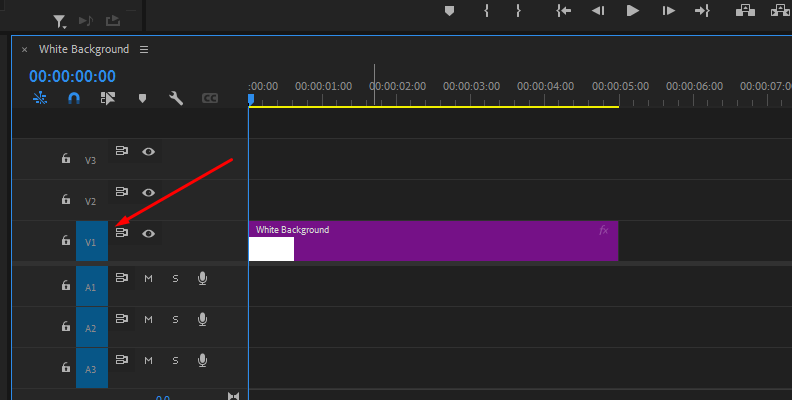
The first step is to create a white background layer using the built-in Color Matte feature.
How to Create a Color Matte
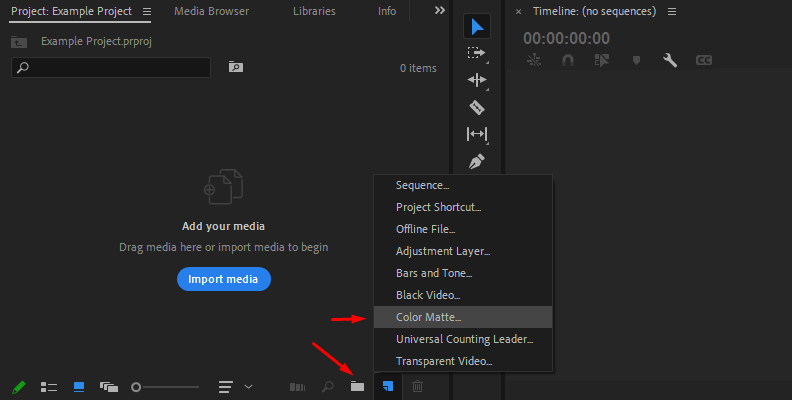
- Go to the Project Panel and click on the New Item icon at the bottom.
- Select Color Matte from the list.
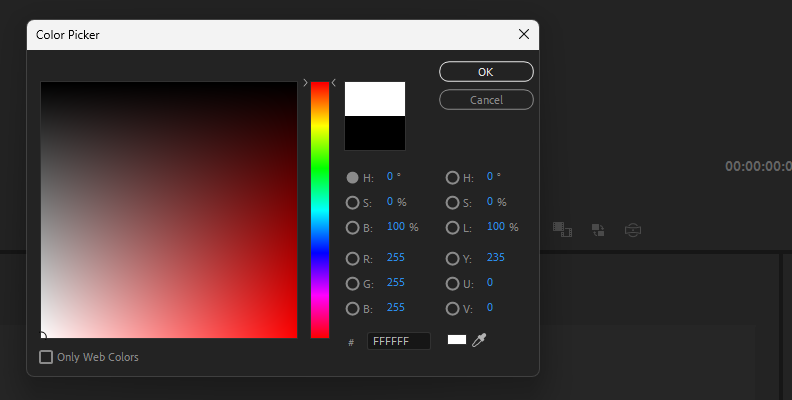
- In the color picker, choose pure white (RGB: 255, 255, 255).
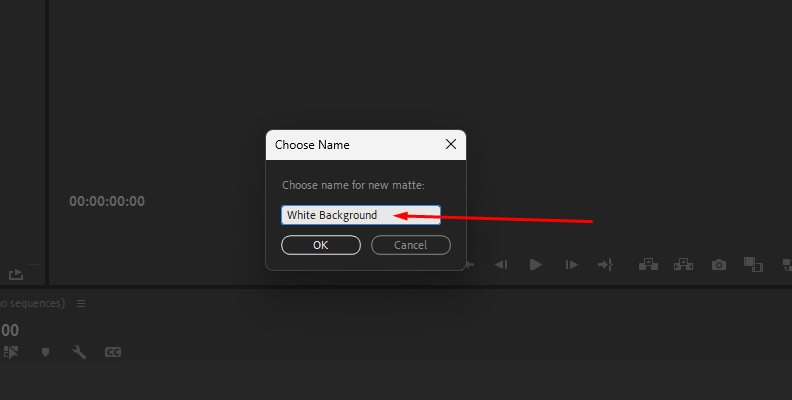
- Name the color matte (e.g., “White Background”) and click OK.
Once created, drag the color matte onto the timeline. Place it on Video Track 1, ensuring it's beneath any other layers so that it serves as the background.
-
Step 2: Isolate Your Subject Using a Key
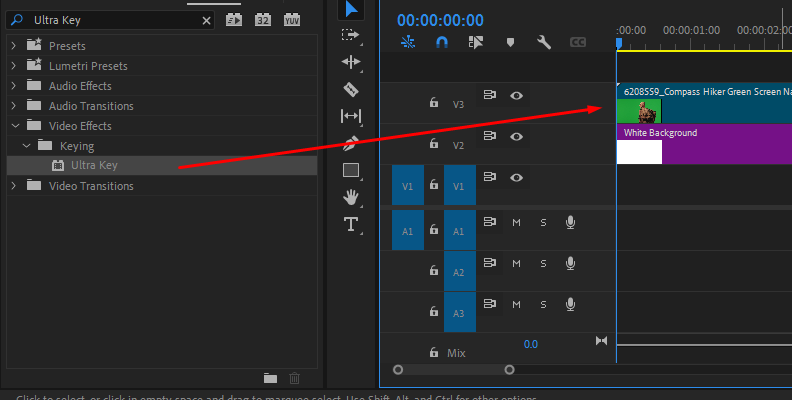
If your subject was shot on a green or blue screen, you can use the Ultra Key effect to remove the original background and place it over the new white matte.
How to Use Ultra Key
- Select your clip in the timeline.
- Open the Effects Panel and search for Ultra Key.
- Drag the effect onto your clip.
- In the Effect Controls Panel, use the eyedropper tool to select the background color (green or blue) in your video.
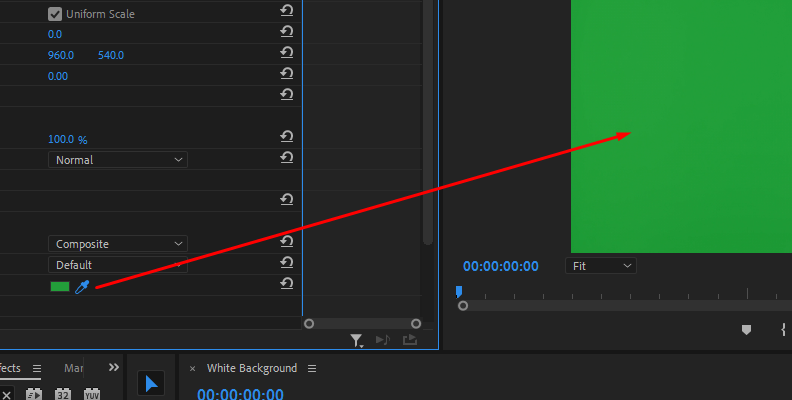
- Adjust Matte Generation, Matte Cleanup, and Spill Suppression settings to refine the key.
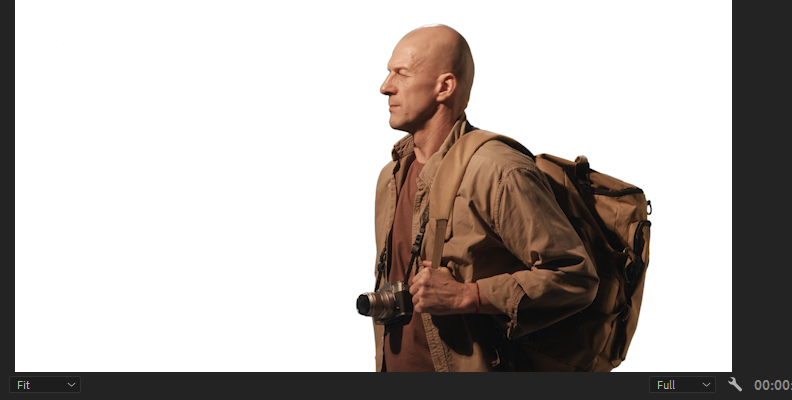
After applying the Ultra Key, the white color matte will now appear behind your subject, giving a clean and consistent background.

-
Step 3: Add Lighting and Shadows (Optional)
To prevent the composition from looking too flat, consider adding a soft drop shadow or gradient lighting effect behind your subject. This can be achieved using third-party plug-ins or by stacking blurred black shapes with adjusted opacity to simulate natural shadows.
How to Remove White Background in Premiere Pro
Removing a white background is slightly more complex than working with green screen footage because white often overlaps with the brightness of the subject. Still, with a bit of careful adjustment, you can isolate and remove it effectively.
-
Step 1: Apply the Luma Key Effect
The Luma Key effect is designed to remove pixels based on their luminance, making it ideal for targeting white backgrounds.
How to Apply Luma Key
- Select your video clip in the timeline.
- Open the Effects Panel and search for Luma Key.
- Drag the Luma Key effect onto your clip.
- In the Effect Controls Panel, set the Key Type to Luma.
- Adjust the Threshold value until the white background becomes transparent.
- Tweak the Cutoff to refine the transparency edge around your subject.
Depending on your footage, you may need to experiment with the Threshold and Cutoff settings. High Threshold values will target more of the bright areas, which can sometimes eat into your subject, especially if they're wearing light clothing.
-
Step 2: Smooth the Edges (Optional But Recommended)
To improve the edge quality and eliminate harsh outlines, you can stack some additional effects.
Use Gaussian Blur to Soften the Key
- In the Effects Panel, find Gaussian Blur and drag it onto your clip.
- Increase the Blurriness slightly—around 2–5 pixels—to soften the hard edges introduced by the key.
- Ensure Repeat Edge Pixels is checked to avoid dark borders around the subject.
Refine Using Matte Cleanup (for Ultra Key Workflows)
If you’re combining multiple techniques, such as using Ultra Key on white or light grey backgrounds, the Matte Cleanup section of the Ultra Key settings can help:
- ChokeL: Tightens the matte around your subject.
- Soften: Smooths out jagged or harsh outlines.
These refinements help preserve detail while still removing unwanted background elements.
-
Step 3: Use Color Key or Ultra Key for Specific Cases
If the white background is not pure or has slight color variation, the Color Key effect can sometimes offer better control.
How to Use Color Key
- Search for Color Key in the Effects Panel and apply it to your clip.
- Use the eyedropper tool to select the white background in your video.
- Increase the Color Tolerance until the white background is mostly removed.
- Adjust Edge Feather to blend the subject more naturally.
Alternatively, try using the Ultra Key again, even on white or light grey backgrounds. While it's designed for chroma keying, Ultra Key offers more advanced refinement tools than Color Key, and with proper tweaking, it can still yield good results.
-
Step 4: Mask Problem Areas Manually (If Needed)
In difficult cases where automated keying removes part of your subject or leaves white patches, you can use masks to manually isolate the subject.
- Select the clip and go to the Effect Controls Panel.
- Under the Opacity section, use the Free Draw Bezier Tool to draw a mask around the subject.
- Feather the mask edge to blend it naturally.
- Animate the mask path if the subject is moving.
Manual masking is time-consuming but effective when other methods fall short, especially for short or important clips.
How to Create White Background in Premiere Pro With Primatte
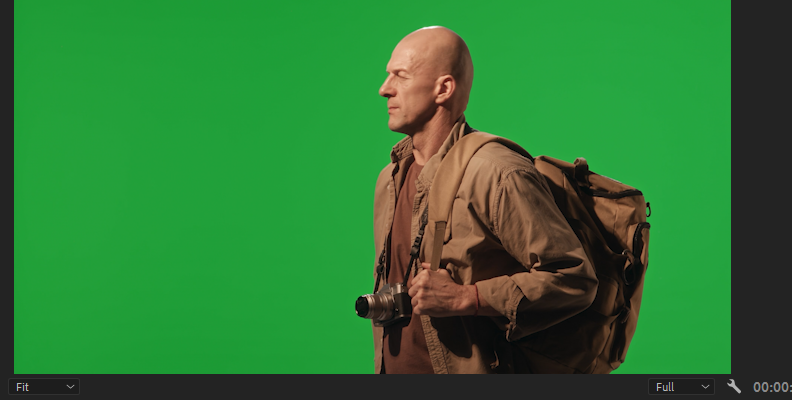
If you have the Boris FX Continuum plug-in suite installed, Primatte Studio provides an advanced solution for background removal and replacement, offering more precision than Premiere Pro’s native keying tools.
Primatte excels at chroma keying, especially in situations with uneven lighting or complex edges like hair, and works fully within Premiere Pro's editing environment.
-
Applying the Primatte Studio Effect
In the Effects Panel, navigate to:
Video Effects > Boris FX Continuum > Key & Blend > BCC Primatte Studio.
Drag the BCC Primatte Studio effect onto your video clip in the timeline.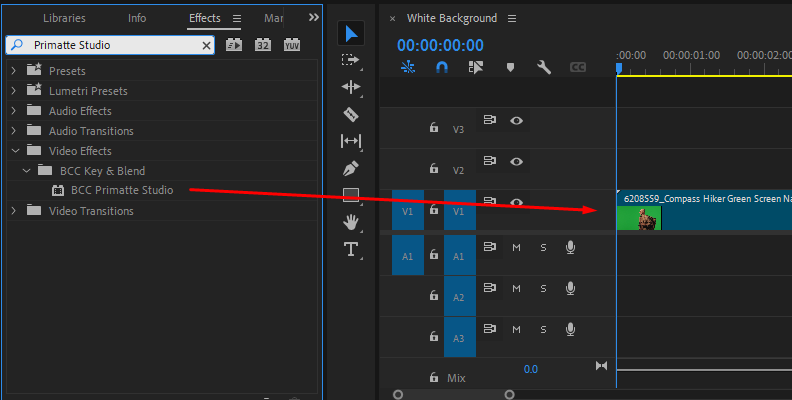
With the clip selected, go to the Effect Controls panel. Scroll to the Primatte Studio section and click the Auto-Analyze button. This will automatically detect and key out the background color (usually green or blue).

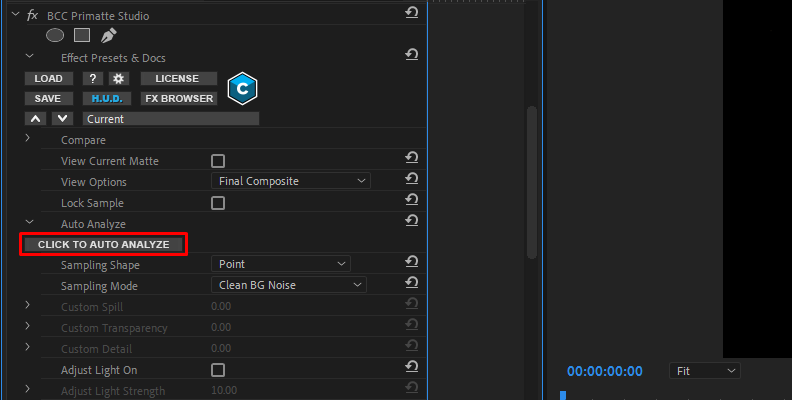
If the automatic key isn’t perfect, manually tweak it using the controls in the Effect Controls panel.
Use Select Background to sample additional areas that should be transparent, and Select Foreground to recover parts of the subject that may have been removed.
You can also switch the view mode to Matte or Alpha Channel to better inspect your key.
-
Refining the Edges and Cleaning Up the Matte
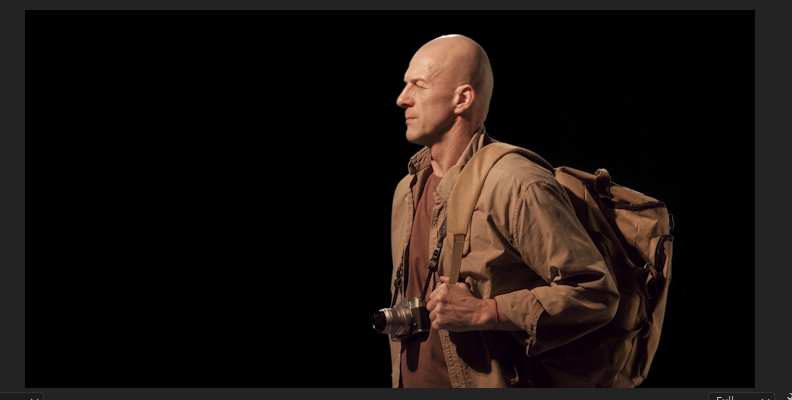
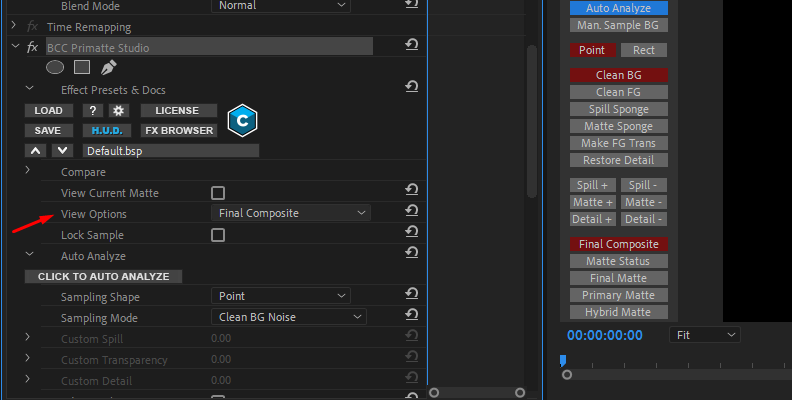
After applying Primatte Studio and using Auto-Analyze to generate a basic key, you can refine the result directly in the Effect Controls panel. While Premiere Pro doesn’t support the full Primatte UI found in After Effects, you still have essential tools for cleanup.
Use the Pick Background button to manually click on any remaining background areas that should be transparent. If parts of your subject were accidentally removed, use the Pick Foreground button to restore them.
To inspect the transparency and matte edges, change the View setting from Composite to Matte or Alpha Channel. This helps you visually spot rough edges, holes, or areas needing more cleanup.
Depending on your installed version of Boris FX Continuum, you may also find basic matte refinement controls like:
- Soften Matte: smooths the matte for less jagged edges.
- Shrink Matte: contracts the matte around the subject to remove halos.
- Light Wrap: blends the subject into the background by simulating light bounce.
- Edge Color Correction: adjusts the fringe color to better match the background.
If those options are not visible, consider doing additional edge smoothing by stacking Premiere’s built-in effects like Gaussian Blur (applied carefully) or Choke Matte from third-party plug-ins.
-
Adding the White Background
Once the subject is cleanly keyed out, create a white background to place behind it.
Go to the Project Panel and click the New Item icon. Choose Color Matte, and set the color to pure white (RGB: 255, 255, 255). Name the matte (e.g., “White BG”) and drag it onto Video Track 1, making sure it sits underneath your keyed clip in the timeline.
This will place your subject over a clean, bright white background—perfect for interviews, product showcases, or professional-style talking head videos. The refined edges from Primatte Studio ensure the subject blends naturally for a polished final look.
How to Remove White Background in Premiere Pro With Primatte
Primatte Studio is widely recognized for green and blue screen removal, but it can also effectively remove white backgrounds in Premiere Pro. This technique is particularly useful when your footage was shot against a plain white backdrop and you want to composite it over a new background or integrate it into a graphic.
-
Applying Primatte Studio to Your Clip
- In Premiere Pro, open the Effects panel and find Primatte Studio under Boris FX Continuum > Key & Blend.
- Drag the Primatte Studio effect onto your clip in the timeline.
- Select the clip and open the Effect Controls panel.
- Click the Primatte Studio UI button to launch the plug-in interface.
-
Selecting and Removing the White Background
Inside the Primatte Studio interface:
- Ignore the automatic keying options like Auto-Analyze (which target green/blue screens).
- Use the Select Background tool and click on the white areas of your footage to sample the background color.
- For uneven lighting or shadows on the white background, sample multiple points to improve accuracy.
-
Refining Your Matte
- Switch to Matte View to check the alpha channel and see which areas are keyed out.
- If parts of your subject (such as light skin, hair, or clothing) are accidentally removed, use the Select Foreground tool to click on those areas and restore them.
- Use the Add to Foreground brush to manually paint back fine edges or semi-transparent areas, which is helpful for hair or glass.
- In the Matte Cleanup section, adjust settings like Soften, Shrink, and Erode to smooth edges.
- If a white fringe remains around your subject, increase the Decontaminate control under Spill Suppression to remove leftover white edge spill.
-
Compositing Over a New Background
Once the white background is removed, your subject will appear over a transparent background in Premiere Pro. Place any new background layer—such as an image, video, or color matte—on a track below your keyed clip in the timeline.
Check the composite carefully for any edge issues, and return to Primatte Studio to fine-tune your matte if necessary.
Final Words
Both creating and removing white backgrounds in Premiere Pro can be accomplished using native tools like Color Matte, Ultra Key, Luma Key, and Color Key. Creating a white background is straightforward and works especially well with pre-keyed or green screen footage. Removing a white background requires a bit more effort and experimentation, particularly with edge control and lighting conditions.
While Premiere Pro isn’t a dedicated compositing tool like After Effects, it’s more than capable of handling background work for most typical use cases. With these techniques, you can achieve professional results without leaving your editing timeline.
FAQ
This section contains some of the most frequently asked questions on this topic, along with their answers. For more detailed information, we recommend reading the full guide, but you can also use this section for shorter, quicker answers.
How Do I Change the Background Color in Premiere Pro?
A: There are multiple ways to change the background of a video in Premiere Pro, like using the built-in tools and plug-ins, such as the Continuum plug-in pack by Boris FX, in which you can find tools like Primatte Studio designed specifically for such tasks. The main idea is to use a keying tool to remove the old background and then use another video on a video track below your main video, which will serve as the background.