Green screen work (or blue screen) is a popular way to change backgrounds in films, television, news, marketing, and social media content. Whether from an expert Hollywood filmmaker, a small independent studio, or a content creator recording at home, the green screen is widely used and stands out as one of the most recognized post-production techniques for adding visual effects and enhancing content creation.
Anyone with a green screen, video editing software, and basic knowledge can key out the green screen to replace it with a more suitable and visually appealing background. However, every video editor faces one challenge when keying out the green screen to isolate a subject: the hair, especially light-colored hair.
Green screen work is challenging. The results can differ significantly depending on your expertise and the tools you use. You might spend hours trying to remove the green screen, only to find the frustrating green edges around hair strands.
Today, we'll discuss why green screening hair is necessary and the best tools for the job. You'll also learn how to green screen hair, and I’ll provide a list of useful tips for keying hair in green screen footage.
Why Do You Need to Green Screen Hair?
When you shoot a clip with a green screen, it's often because you want to isolate the subject from the background. Depending on your goals with the video and where it will be published, you'll have a level of detail and realistic look you want to execute.
Hair is complicated to key because it has fine details that make it look transparent. The keyer plug-in has difficulty distinguishing it from the background and leaves green edges around the subject. It also has movement, making it difficult to track throughout the greenscreen footage.
If you’re just doing projects for school, family, and friends, you might not care if there are a few green spills over the hair. But if you want to create high-quality content online or work for a film studio, whether small or big, you want your hair keyed perfectly so the final compositions look realistic with no color spills and sloppy green edges.
What Are the Best Tools for Cleaning up Hair and Green Screens?
Many video editors and filmmakers have discovered tools that simplify working with hair green screens.
Continuum

Continuum is a powerful tool with many plug-ins for green screen compositing, especially for tricky hair. It features Primatte Studio, Spill Remover, Edge Cleaner, Chroma Key, Matte Cleanup, and thousands of other filters and effects for key, blend, and other visual effects for your videos. Continuum is a cross-platform plug-in supported by various popular hosts on Mac and Windows.
Silhouette

Silhouette is an industry-standard paint, rotoscoping, and keying tool for visual effects and post-production. It features ML models to quickly generate masks and animate detailed mattes for easy keying for hair on a green screen. Silhouette is a multi-platform plug-in with a standalone application for keying complex hair wherever you work.
Delta Keyer

DaVinci Resolve offers many useful keying tools. One of the most complete, advanced, and favorite is the Delta Keyer in Fusion. It analyzes background and foreground colors to generate a robust matte with many settings to fine-tune and refine it, which allows it to work in detail with a hair green screen.
Keylight

Keylight is a popular After Effects plug-in for chroma key and green screen hair. Combined with other AE effects such as Key Cleaner and Advanced Spill Suppressor, it offers a complete keying solution for challenging green screen footage. Finding the right settings takes some trial and error, but once you do, it can handle strands of hair.
BCC+ Spill Remover: Hair Green Screen Step-by-Step Tutorial
BCC+ Spill Remover is an advanced plug-in featured in Continuum that removes spills from the green screen in a matter of seconds. It helps clean up the green edges around the hair to make a more realistic composition.
Before jumping to the guide, ensure you have installed and updated Continuum on your computer. Continuum and BCC+ Spill Remover can be used inside After Effects, Premiere Pro, Final Cut Pro, Avid Media Composer, Resolve, VEGAS Pro, and Nuke.
You can use the Continuum free trial to follow this step-by-step tutorial before purchasing.
Step 1: Set Up Your Project
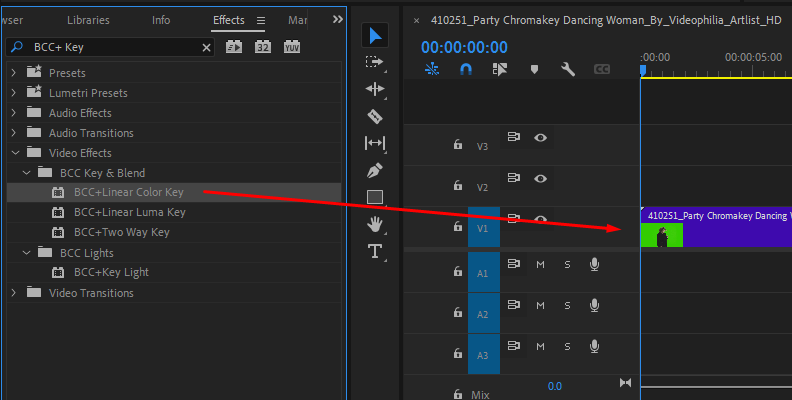
Open your supported host and import your video clip with a hair green screen. Use your preferred method for chroma keying to remove the green screen background. For now, don't worry about the spills on your subject's hair and the green edges; that's what BCC+ Spill Remover is for.
Step 2: Add the BCC+ Spill Remover Filter
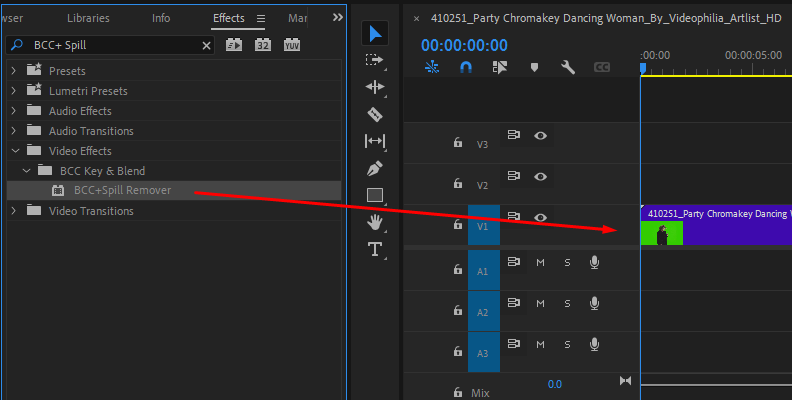
Open your host’s effects library and search for BCC+ Spill Remover. It should appear under the BCC Key and Blend category. Drag and drop the filter into the video clip with the hair to clean up the green spill.
Step 3: BCC+ Spill Remover Settings for Hair
The filter will analyze the clip and apply the default settings, which you can tweak by adjusting the Amount slider to control how much of the Spill Remover is applied to the image.

BCC+ Spill Remover provides two Spill Replace modes. You can select between Channel Limit and Classic Continuum, with more settings to correct your hair green screen for each method.

Channel Limit Mode
Channel Limit is the default option. It scans and analyzes the image in your clip to detect and remove the green edges from the hair. This mode lets you choose the type of screen used (green, blue, or red) for better results. Use the Bias slider to adjust the replacement tones for the spill or fix it to a channel.
Classic Continuum
The Classic mode uses a more traditional way of spill remover. You can manually select the screen color with the color picker, which is useful when the green screen is an uncommon shade of green.
The Spill Ratio removes the green left in the hair, but it may change the tone of the foreground image, which you can balance by tweaking the Spill Tone Mix to bring back some of the green and the Spill Tone Range to adjust the foreground color range and restore the original color.
Step 4: Final Touches
For the best results, use multiple instances of the Spill Remover and complement them with color correction tools if the filters affect your subject’s skin. You can use the integrated Mocha to mask and track the hair areas and add an extra layer of Spill Remover to clean the residual green around the hair.
Pro Tips For Keying Hair on a Green Screen
Working with a hair green screen is complicated, so don't feel discouraged if you don't get the perfect key the first time. With these tips, you'll have more tools to shoot quality footage, making your post-production process less difficult.
Correct Lighting
One of the most common issues when keying hair on a green screen is the lighting. You must ensure the background green screen is evenly lit to avoid different shades of green that will give your keyer software a harder time. Try to light your subjects from the side and background with white light to avoid the green light (from the front light’s reflection) to get over your subjects.
Distance from the Screen
Another common mistake is to place the subjects close to the green screen. Ask your subjects to step farther from the screen to avoid green reflections and shadows cast by your subject.
Shoot in High-Resolution
Shooting in higher resolution is generally better for any type of editing. 4K footage will provide you with more detail to work with and improve the accuracy of the key. A 1080p video will still be ok if it is high-quality and the green screen has good lighting.
Use Multiple Masks
Divide your masks, one for the subject main body and another for the hair. This will give you more control over the key inside the hair mask and allow you to fine-tune the settings only for the hair area. Then, you can create more masks as you see fit to apply selective color correction if the tone changes too much.
Layers of Filters
With complex green screen footage, you'll need to add more levels of keying. Add multiple instances of keying, spill removers, color correction, and blur to clean and shape the image as you want it for your video.
Final Words
Keying a hair green screen is challenging, but you can achieve professional results with practice and constancy with BCC+ Spill Remover. Remember that your hair key and the result will only be as good as the source material you provide to the plug-in for analysis, so put into practice the tips provided to make hair green screen less of a stressful task.
Good luck!