Proper audio volume, audio mixing, or simply put, audio quality, is a crucial aspect of video production, often making the difference between a professional-looking video and one that feels unpolished.
Adobe Premiere Pro, as a comprehensive video editing tool, offers various ways to enhance and refine an audio file, allowing you to create what best matches your visual narrative. Whether you're looking to reduce background noise, adjust volume levels, or make voices stand out, Premiere Pro has built-in tools that can bring out the best in your audio.
In this guide, we'll explore different methods to enhance audio quality in Adobe Premiere Pro, starting from basic adjustments to advanced features, so without further ado, let's get straight into it.
Ways to Enhance Audio in Premiere Pro
Premiere Pro is the industry's most versatile software when it comes to video editing and, in some cases, even photo and audio editing, as effects and other tools' functions can be applied to images and audio files, too.
In this section, you can learn about most of the ways you can make an impact on your video clip's audio while working in Premiere.
Using the Audio Mixer Panel
The Audio Track Mixer in Premiere Pro is a powerful tool for managing sound across multiple tracks. It resembles a physical audio mixer and allows you to adjust volume, panning, and other Premiere Pro audio effects in real-time.
Here’s how to make the most of it:
- Volume Control: Adjusting the volume levels of individual tracks helps in balancing sounds. Lower background music or ambient noise so they don’t overpower the main audio, like dialogue. Set the levels so that each track contributes to the overall sound without clashing.
- Panning: For stereo effects, you can pan sounds to the left or right channel. This technique is helpful for creating a more immersive experience, especially when dealing with sound effects or music.
- Applying Effects: You can add effects directly to the audio track through the mixer. Options like reverb, delay, and equalization are available and can be customized per track. For example, adding a subtle reverb to dialogue can create a sense of space, making voices sound more natural.
Essential Sound Panel
The Essential Sound Panel is a user-friendly tool that allows you to label clips based on their purpose (dialogue, music, sound effects, ambiance) and apply tailored enhancements accordingly. This panel is especially beneficial for beginners due to its straightforward layout and targeted controls. Here’s a breakdown of how to use it:
- Assigning Audio Types: Label clips as Dialogue, Music, SFX, or Ambience to unlock specific controls. Dialogue clips, for instance, have options for clarity and loudness, while Music clips offer ducking options to fade out music during dialogue.
- Noise Reduction: Under the Dialogue settings, you can enable noise reduction to filter out background noise, which is particularly useful for outdoor recordings or noisy environments.
- Clarity Enhancements: Within the Dialogue section, you’ll also find sliders for “Dynamics” and “DeEss.” These tools help you manage audio peaks and remove harsh “S” sounds, making voices clearer.
- Auto-Ducking for Background Music: This feature reduces the volume of background music when dialogue is present, which can be crucial in ensuring that voices are heard clearly over other sounds.
Applying Audio Effects
Premiere Pro offers a library of audio effects that can be directly applied to individual clips. Some of the most commonly used effects include:
- EQ (Equalization): EQ is essential for balancing the tonal quality of audio. Adjusting EQ settings can enhance the lower or higher frequencies, making sounds fuller or brighter depending on the tone you’re aiming for.
- DeNoiser and DeReverb: These tools are helpful for cleaning up background noise and excess reverb in recordings. DeNoiser reduces consistent background sounds, such as air conditioning hum, while DeReverb removes echo that often appears in large, empty rooms.
- Compressor: This effect controls the dynamic range by lowering the volume of loud sounds and raising softer ones. Compression helps make dialogue sound more consistent, particularly useful when audio levels fluctuate frequently.
To apply an effect, drag it from the Effects Panel and drop it onto your audio clip. Then, use the Effect Controls Panel to fine-tune the parameters. For example, with EQ, you can increase mid frequencies to bring out vocal presence or reduce lower frequencies to minimize background rumble.
Manual Keyframing for Volume Adjustments
While the Essential Sound Panel offers automated tools, sometimes a manual approach provides greater precision. Keyframing allows you to adjust volume levels at specific points in a clip, ideal for gradually increasing or decreasing sound intensity.
- Adding Keyframes: Select your audio clip, and in the Timeline Panel, enable keyframes by selecting the stopwatch icon next to the “Volume” attribute in the Effect Controls Panel. Click to create keyframes at points where you want to adjust the volume, then move each keyframe up or down to set the desired level.
- Volume Transitions: You can use keyframing to create volume transitions, such as fading music in and out. For example, start with a low volume keyframe, gradually raising it to build the audio naturally within the scene.
Keyframing allows you to address specific volume concerns that might not be as easy to control with automated tools, giving you the flexibility to shape audio dynamically.
Adjusting Loudness and Peaks
Ensuring consistent loudness levels across your project is crucial to avoid jarring volume differences. Premiere Pro includes tools for analyzing and adjusting loudness levels to meet broadcast standards or simply maintain a balanced sound.
- Loudness Meter: The Loudness Radar effect (available through the Essential Sound Panel) displays the overall loudness of your clip. Aim for around -6 to -12 dB for standard listening environments, though levels may vary based on your platform’s standards.
- Audio Gain: To make universal adjustments, right-click on the clip and select Audio Gain. Here, you can increase or decrease the gain to ensure your audio is loud enough without distortion.
How to Enhance Audio in Premiere Pro with Voice Enhance
Try Voice Enhance Now!
Instantly transform any voice recording into professional-quality sound with the power of AI. No internet access required- your audio stays private and secure. Toggle it on/off to hear the difference.
On-location Interview
Selfie-style Phone Audio
Zoom Call
Ridiculous Echo
Traffic Noise
Far from Mic
Untreated Room
Recording at Home
On-location Interview
Though programs like Adobe Premiere Pro offer many tools to improve the quality of your audio clips, sometimes there are better choices out there for when you have multiple audios and many audio tracks to work on.
These choices often come in the form of third-party plug-ins and automate a large part of the process, saving you a lot of time both per project and long term. This is because you can make all necessary changes in just a few clicks instead of having to manually do things step by step like you would otherwise.
In this section, we'll be using Voice Enhance by CrumplePop, an AI Audio Enhancer tool many consider to be as close to magic as we can get when it comes to audio editing and sound quality improvement plug-ins.
CrumplePop is a Boris FX product, so once you download the Boris FX hub and install CrumplePop for your software host of choice, in this case, Adobe Premiere Pro, simply follow the steps below and see how easy it is to turn raw audio signal into perfection for your project.
Here's what you need to do:
Step 1: Create A New Project And Import Media
To improve audio quality in Premiere Pro, the first step is creating a new project and importing the audio clip(s) you want to work on.
So, launch the software, and on the first screen that shows up, click the "New Project" button.

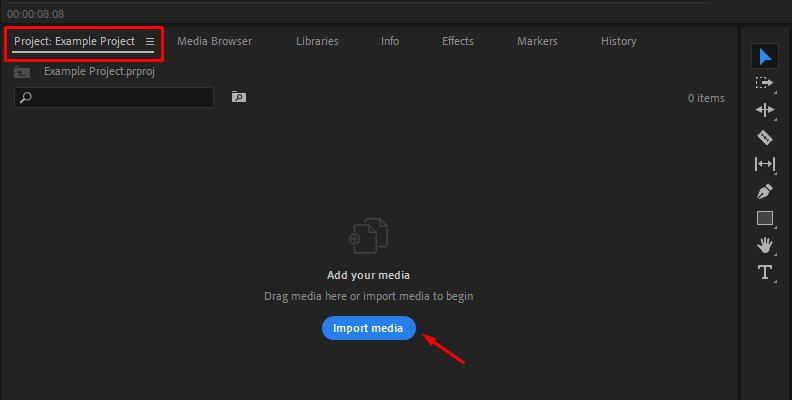
Once you're in the software and see the interface, you need to import media. To do this, navigate to the "Project" panel and click the blue "Import Media" button as shown in the image below.
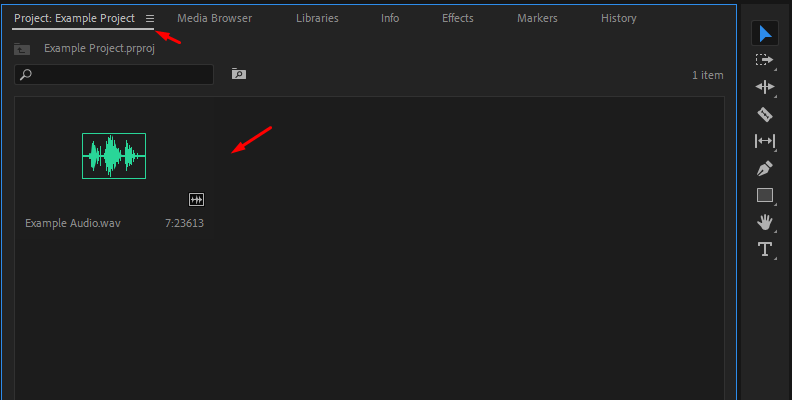
Now, find the audio clips on your disk that you wish to import and finalize the process. When done, you should be able to see the audio clips within the same "Project" panel.
Step 2: Create A Timeline/Sequence And Apply The Effect
Now, to start working on your audio, you need to create a sequence out of the audio file you imported. To do this, simply drag and drop the audio file (or the video file if it has its own audio) over to the timeline area.
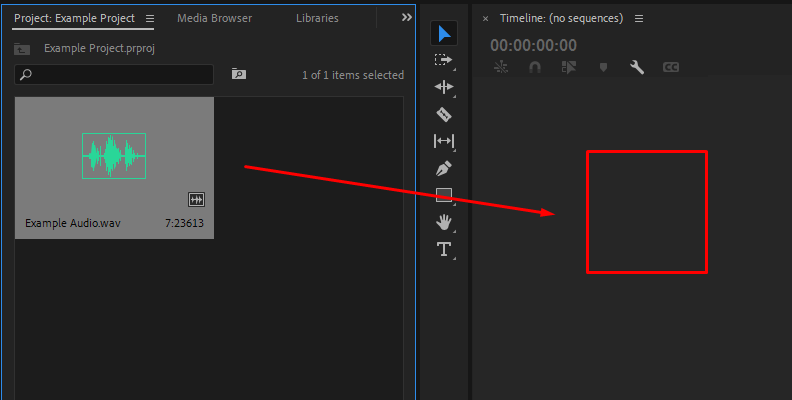
This will create a timeline/sequence of the file.
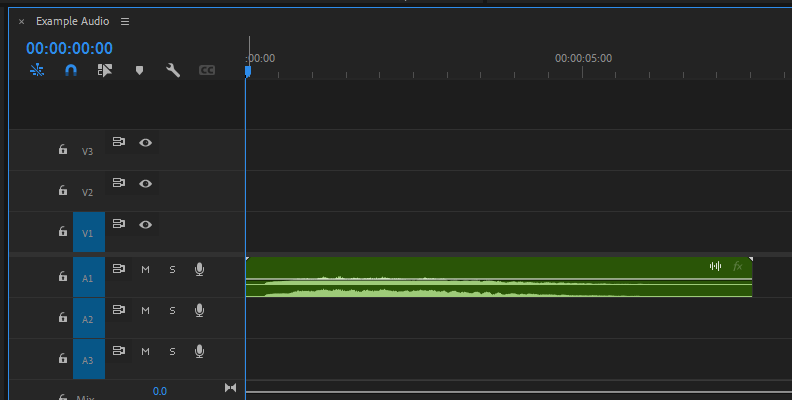
Now, you're ready to apply effects to your audio clip. To proceed, you first need to access the "Effects" panel.
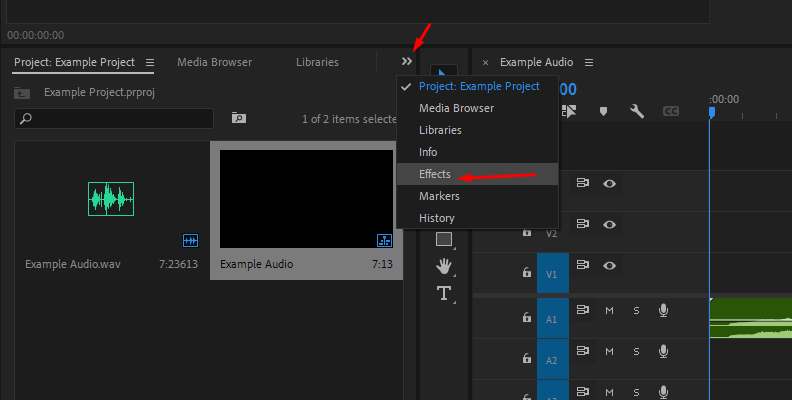
Then, use the search bar to find the effect you're looking for, which, in our case, is the Voice Enhance one by CrumplePop.
If you don't see Voice Enhance right away, make sure you've added the plugin using Adobe's Audio Plugin Manager. Go to Preferences>Audio>Audio Plugin Manager, and click the “scan” button. Then select CrumplePop Voice Enhance and make sure it's enabled.
When you locate the effect, which needs to be under the "CrumplePop Complete" folder, drag and drop it over your audio, as shown in the image below.
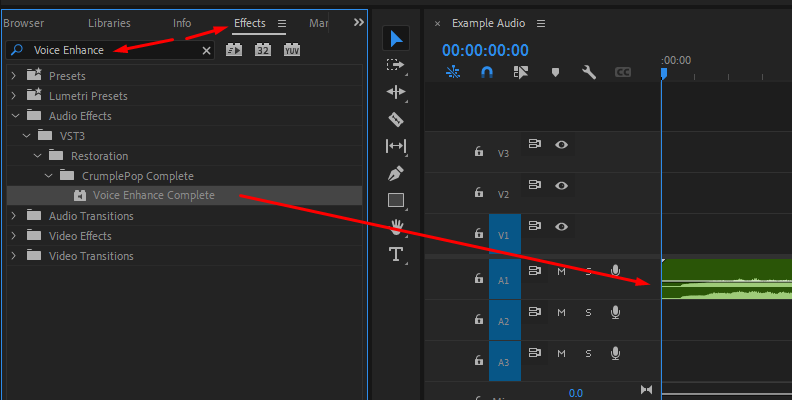
Step 3: Modify Voice Enhance Settings If Needed
Your next step would be to access the Effect Controls panel, where you can modify all parameters for effects that you've applied to your clip. So, first, find the audio track where your clip is located on the timeline, which in our case is A1, and click on it to select it. Then, in the top-left corner, choose Effect Controls, as shown in the image below.
In the Effect Controls panel, you will see the Voice Enhance Complete effect listed.
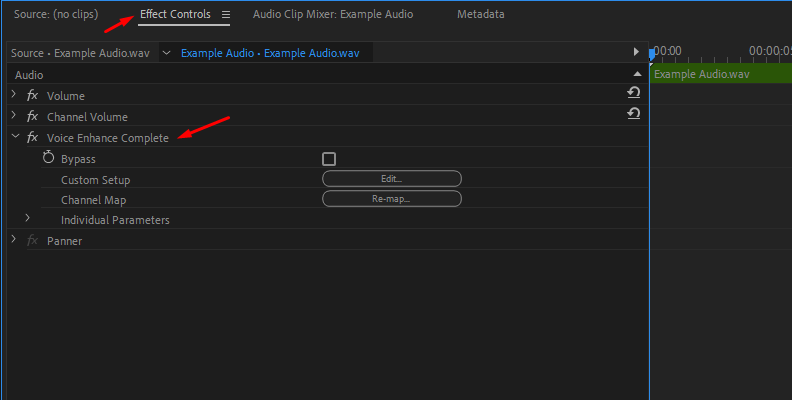
Click on the "Edit" button to access the Voice Enhance interface, and feel free to modify the Strength and other parameters based on your project's needs.
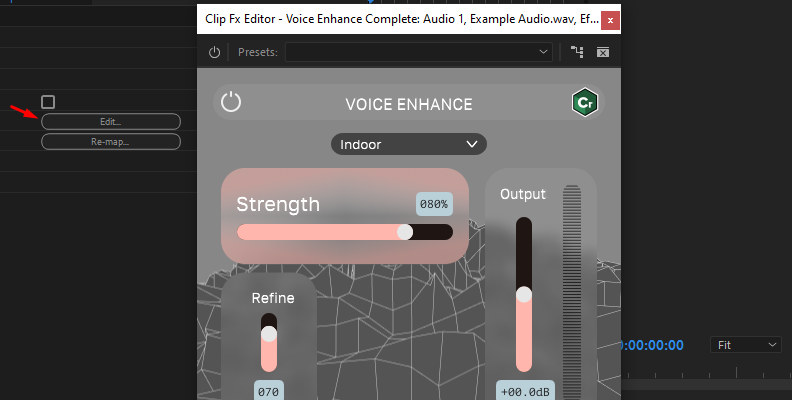
To read more about Voice Enhance, check out the official page.
Final Words
That concludes our guide on improving audio quality within Adobe Premiere Pro, both using the built-in tools and a helpful plug-in that automates everything in just a few clicks.
Hopefully, this will help you with all future work, as audio is a very important part of every video project.
We wish you the best of luck with all your upcoming projects, and thank you for reading!


