Recording audio on iOS or Android phones is easier than ever, thanks to technological advancements, but if you need to really capture good audio for your projects, there are a few things you need to know about.
From optimizing your surroundings to using a portable microphone compatible with your iPhone or Android phone, we cover it all in the guide below.
Here's what you need to know!
How to Record Good Quality Audio on Phone
Although modern smartphones are equipped with shockingly nice hardware compared to just a few years back, when it comes to professional, high-quality sound recording, using an external microphone is still the preferred method.
However, this doesn't mean you cannot get good results by simply using your phone's voice recorder app and a well-set environment for good recording quality.
Here's how you can optimize your surroundings and still get professional audio sound quality while only using your phone.
Choose a Quiet Environment
Background noise, like the hum of a fan, traffic, or other ambient sounds, can interfere with your recording. Try to find a space free from interruptions and excessive noise.
If a quiet environment isn’t available, consider using noise-canceling features available on some recording apps or headphones. For the best results, avoid hard, reflective surfaces that create echoes and opt for softer, furnished rooms that absorb sound.
Also, make sure all phones are set to airplane mode so you don't get any unwanted calls that can potentially ruin a perfect audio take.
Use an External Microphone (if Possible)
External microphones offer far superior sound quality compared to built-in phone microphones, capturing sound with clarity and precision. Here are some types of external mics to consider:
- Lavalier Mic (Lapel Microphones): These small clip-on mics are perfect for interviews or solo recordings. They capture clear voice audio without much background noise.
- USB Condenser Microphones: These mics often have a fuller sound, suitable for professional-grade recordings. They’re ideal if your phone supports USB connections (some may require adapters).
- Shotgun Microphones: Shotgun mics are directional, meaning they pick up sounds directly in front of them while reducing noise from the sides and rear, making them excellent for outdoor or crowded environments.
Most of these options connect directly to a phone or use adapters, so you have flexibility no matter your device.
Adjust Phone Settings for Optimal Audio Quality
Some phones and recording apps let you control settings like bitrate (the data rate for audio, where a higher rate generally means better quality) and sample rate (the number of samples per second in your recording; common rates are 44.1 kHz or 48 kHz).
For the highest quality, select the maximum bitrate and sample rate available. Be aware that these settings use more storage, so you may need to monitor your phone’s space. Additionally, you may be able to choose formats like WAV for uncompressed audio if your phone or app supports it, which maintains higher quality than compressed formats like MP3.
In apps such as the voice memos app on iPhone devices, you can set the recorded audio quality to "lossless" which will take up slightly more storage space but will ensure you get the best possible quality when you record audio.
Position the Phone Correctly
For the clearest sound, hold the phone or external mic 6–12 inches from your mouth. This distance minimizes pops and other harsh sounds from certain consonants (like “P” and “T” sounds) when capturing audio.
If you’re recording something other than voice, such as an instrument or environment sounds, experiment with distance and angle to capture the best audio without distortion. Testing different positions allows you to find the right balance of clarity and volume.
Use a Dedicated Audio Recording App
While default recording apps are functional, dedicated audio apps offer more control over quality and sound settings. Look for apps with features like gain control (which adjusts the input signal strength), noise suppression, and EQ (equalization for sound balancing). Popular choices include apps like Voice Record Pro, Dolby On, and Ferrite (for iOS), which provide higher-quality audio and advanced editing features.
Reduce Handling Noise
Handling noise occurs when you move or touch the phone while recording. This noise can be distracting and degrade the audio. To prevent it:
- Place the phone on a stable surface or use a tripod to keep it stationary.
- If you must hold the phone, keep movements minimal and grip the edges lightly to avoid rustling or tapping sounds. Some cases, especially hard cases, can amplify handling noise, so consider removing them for the recording.
Apply Soundproofing Techniques
If you can’t control your recording environment, simple adjustments can help reduce unwanted noise:
- Place the phone on a towel to reduce vibrations.
- Record in a closet or a small, soft-furnished area to minimize echo.
- Hang blankets or curtains on walls nearby to dampen sound reflections. These small adjustments can help you achieve a studio-like quality even in non-ideal locations.
Test and Listen to Your Recording
A quick test before recording is essential to ensure all settings and equipment are working correctly. Listen to a short test recording with headphones to check for background noise, clarity, and volume consistency.
If you notice any issues, make adjustments to your settings, environment, or mic positioning before starting the main recording. This proactive step can save time and significantly improve final audio quality.
3 Best Apps for Recording Good Quality Audio On Your Phone
Knowing what app to choose for recording audio on your phone can be difficult. This is because there are far more options today than ever before, and if you want to achieve good audio quality by recording with your iPhone or Android device, a lot of time needs to go into research.
Luckily, we've listed some of the best choices regarding audio recording apps for Android phones in this section.
Voice Record Pro
Voice Record Pro is a highly versatile recording app available on both iOS and Android that caters to users seeking high-quality audio control. Unlike many basic recording apps, Voice Record Pro allows users to record in multiple formats, including MP3, WAV, and AAC, which can be useful depending on your storage needs and preferred audio quality. You can set the audio quality (bitrate) and sample rate, which directly affect sound clarity and file size, making it adaptable for various recording environments.
This app also includes several built-in editing tools, such as trimming, adding effects, and adjusting gain levels to ensure your audio is balanced and clear. Additionally, it has options for inserting notes and bookmarks during recording, a helpful feature for interviews and lectures. For sharing, it supports a wide array of export options, including direct upload to cloud services like Dropbox, Google Drive, and iCloud, as well as email sharing.
Best for: Podcasters, journalists, and interviewers who need flexibility in formats and features without sacrificing quality.
Dolby On

Dolby On, available for iOS and Android, is a user-friendly app created by Dolby specifically for producing high-quality audio recordings. With its automatic enhancements, Dolby On is ideal for musicians, streamers, and other content creators who need quick, polished sound. The app leverages Dolby’s renowned audio technology to automatically reduce background noise, adjust tone, and balance audio levels, providing professional-grade clarity with minimal manual adjustments.
Dolby On also includes a range of real-time effects, such as equalization (EQ) to adjust tonal balance, reverb to add depth, and compression to smooth out volume inconsistencies. For musicians, this allows you to experiment with effects and create a studio-like sound directly on your phone. The app also supports lossless audio formats, meaning your recordings can maintain their original quality without compression loss, which is especially valuable for music. Once recorded, Dolby On lets you instantly share your audio to social media or save it in cloud storage.
Best for: Musicians, vloggers, and content creators looking for high-quality, professional sound with minimal setup and automatic enhancements.
Ferrite Recording Studio (iOS Only)
Ferrite Recording Studio is an advanced recording and editing app for iOS, designed specifically for podcasters, narrators, and anyone needing professional multi-track editing capabilities on the go. Unlike most recording apps, Ferrite combines high-quality audio capture with robust editing tools, allowing users to record, cut, mix, and refine audio directly within the app. This is particularly useful for users who need to produce polished, multi-layered audio content.
Ferrite’s recording features include adjustable gain control, noise reduction, and support for high-fidelity audio formats, allowing you to capture pristine audio without distortion. Its editing capabilities are even more impressive: Ferrite provides a multi-track editor where you can layer multiple audio files, trim clips with precision, and add effects like fades and compression. The app also includes automatic ducking, which reduces the background music volume when someone is speaking, enhancing voice clarity.
Ferrite’s interface is streamlined for both beginners and professionals, with intuitive touch controls for editing and rearranging audio segments. You can export your final project in various formats and share it directly to cloud storage or other platforms.
Best for: Podcasters, narrators, and content creators on iOS who want both recording and professional-level editing tools in one app.
Improve Quality of the Audio Recorded on Your Phone with Voice Enhance
Try Voice Enhance Now!
Instantly transform any voice recording into professional-quality sound with the power of AI. No internet access required- your audio stays private and secure. Toggle it on/off to hear the difference.
On-location Interview
Selfie-style Phone Audio
Zoom Call
Ridiculous Echo
Traffic Noise
Far from Mic
Untreated Room
Recording at Home
On-location Interview
Whatever way you choose to record audio on your iPhone or Android phone, you can make it sound better using a convenient AI-powered tool that does all the work for you in just a few clicks.
Voice Enhance is part of CrumplePop, a product included in the Boris FX Suite.
You can download and install CrumplePop for many popular audio and video editing apps, and when we say many, we really mean it. The list of programs compatible with this pack is long. Visit the official CrumplePop webpage and see for yourself.
That said, no matter what software you choose, the process is relatively similar, the only difference being the user interface differences between different programs.
For this specific example, we'll show you how to use Voice Enhance in Premiere Pro, a well-known, versatile video editing program.
Step 1: Create a New Project and Import Media
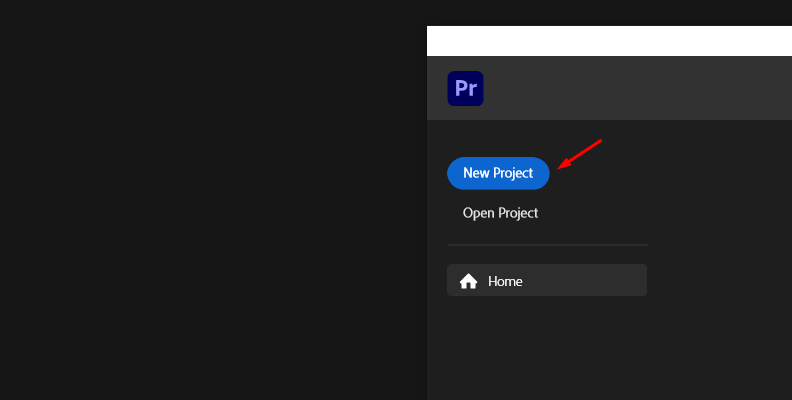
The first step to using Voice Enhance to improve the voice recordings recorded by one or multiple of your iPhones or Android devices is to launch the software compatible with CrumplePop, in this case, Premiere Pro, and create a new project.
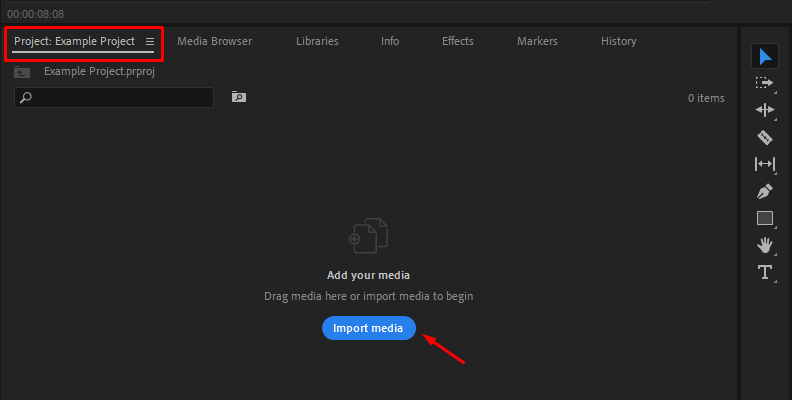
Once you create the project, the next step is to import media, as shown in the image below.
Step 2: Create a Timeline/Sequence
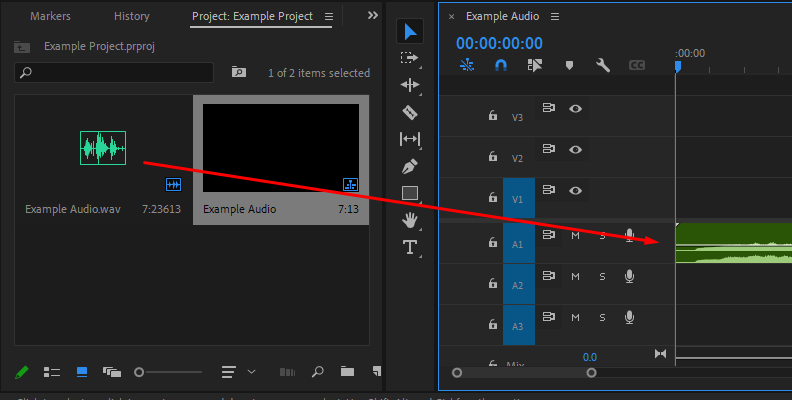
You may have imported a video with an audio track or just an audio clip. Either way, the process is the same for both. You need to drag the file(s) to the timeline area and create a sequence by doing so.
Step 3: Apply Voice Enhance to Your Audio Clip
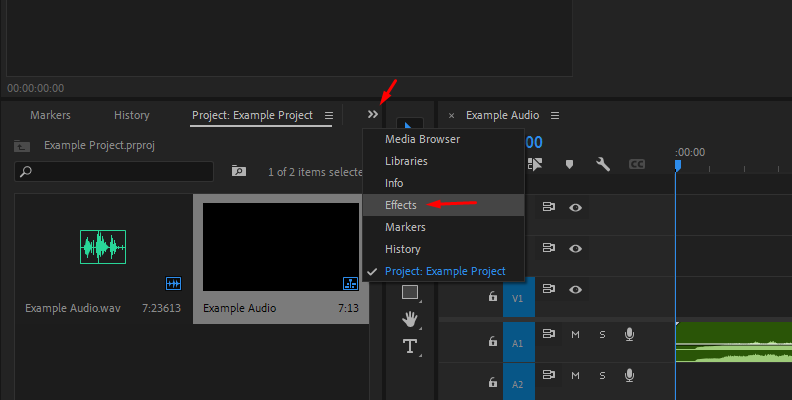
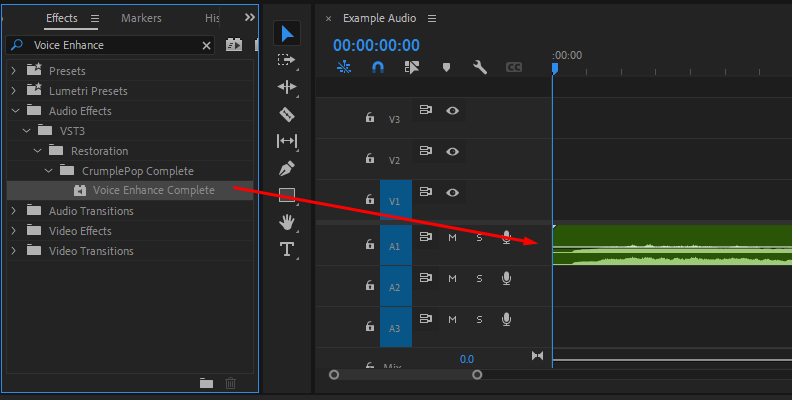
Now that you have a sequence, you can apply effects to it. In this case, we need to access the "Effects" tab and use the search bar to find Voice Enhance, which is part of CrumplePop.
Once we locate the effect, we need to drag and drop it over the audio clip on our timeline.
Step 4: Modify Settings if Needed
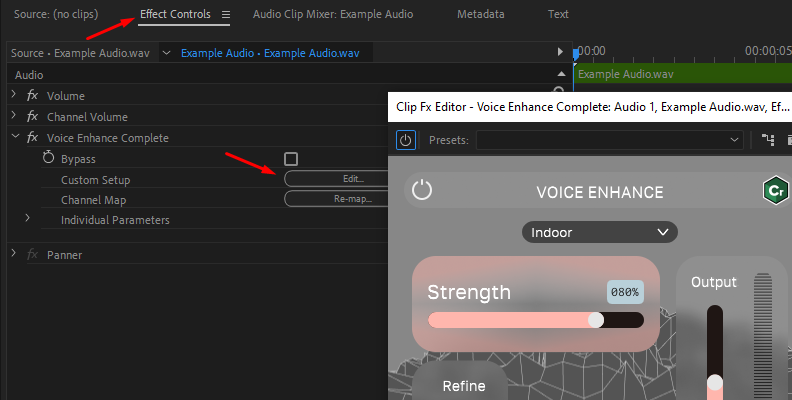
After applying Voice Enhance to your audio clip, you should immediately notice a difference in the audio. However, if you want to tweak settings and make changes based on your project's goals, simply access the Effect Controls panel and click the "Edit" button, as shown in the image below.
Final Words
That covers all you need to know about recording high-quality audio on your phone. Hopefully, this information will be of good use to you when working on all future projects.
We thank you for reading and wish you the best of luck!


