Removing unwanted noise from video files and audio tracks is one of the most common tasks for an audio and video editor. While the ideal scenario is to prevent background noise during the recording process, this isn't always feasible, especially when you're not in control of the recording.
Today, you'll learn how to remove background noise in Sony VEGAS - now, Magix VEGAS - from a video or audio file. You'll also learn several methods to avoid background noise in audio recordings.
Let’s dive in!
How to Remove Background Noise in Sony VEGAS - now known as Magix VEGAS
Starting from easy and quick methods to more complex tools, I’ll show you multiple ways to remove background noise in VEGAS Pro.
Open your project or import video files into VEGAS, and identify the audio file with noise to work with. Now, follow this guide to remove background noise.
Step 1: Delete Parts with Noise
The easiest way to clean up audio is to completely remove the part of the audio with noise. However, this method will only be helpful when the noise is present in dead air. Deleting these parts will remove them from the audio file and replace them with silence, so you can't use this method when there's audio noise in spoken parts, or you'll lose the dialogue, too!
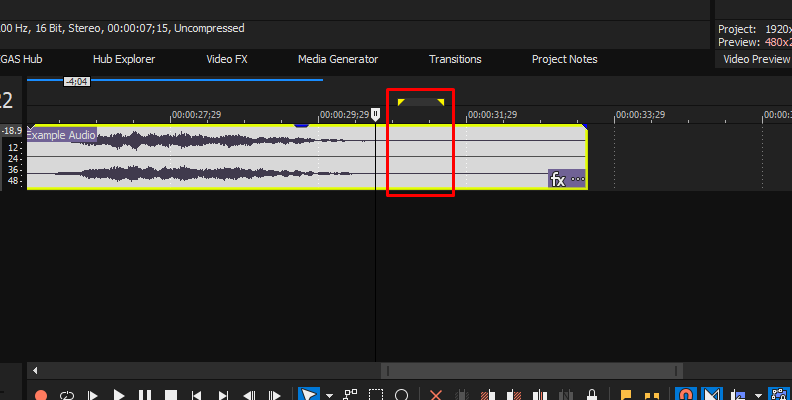
Select the clip you want to cut and place the playhead at the start where you want to cut. Click and drag the area you want to delete to highlight it, and simply press Delete.
Step 2: Lower the Audio Track Volume
When you have unwanted background noise over your voice, you can reduce it by lowering the volume. Since this will affect the entire audio track and audio events, it's recommended that you do this step with a media file where the microphone was close to the source when recording, be it a person speaking or an instrument. In this way, the voice will be the loudest element in the audio and still be audible.
- Go to the track header and drag the slider that reads “Vol” to the left side to reduce the level. It will lower the audio of the entire audio track.
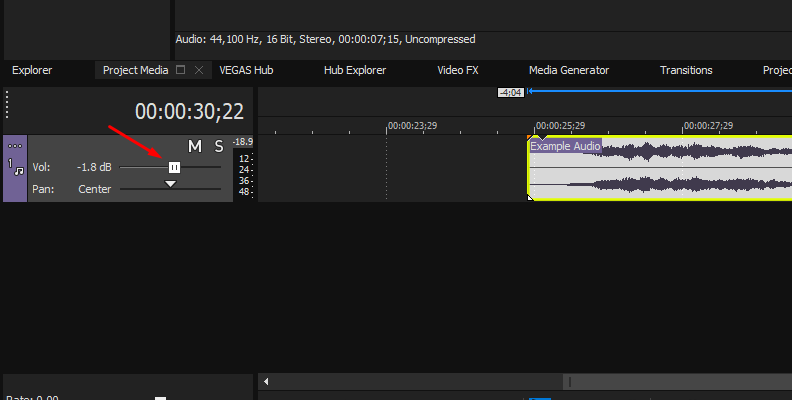
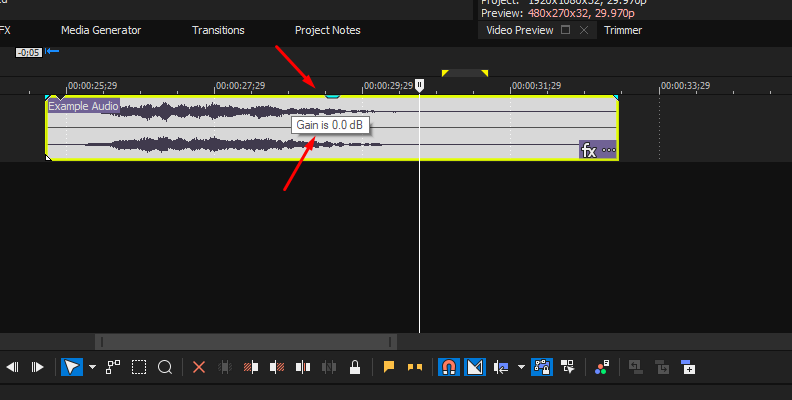
- If you want to lower the volume for audio events individually, place the cursor at the top of the clip until the Gain label appears. Click and drag it down to reduce the volume.
Step 3: Use Track Noise Gate
A noise gate works best when noise is present over spoken audio events and has a constant volume, such as low-level noise from electronics. The noise gate blocks all sounds below a certain level to keep the voice intact.
The tricky part is that, in order to remove background noise, the audio source must be at a constant volume to avoid removing sounds you want to keep. If the volume of your voice changes over time, the noise gate may affect it.
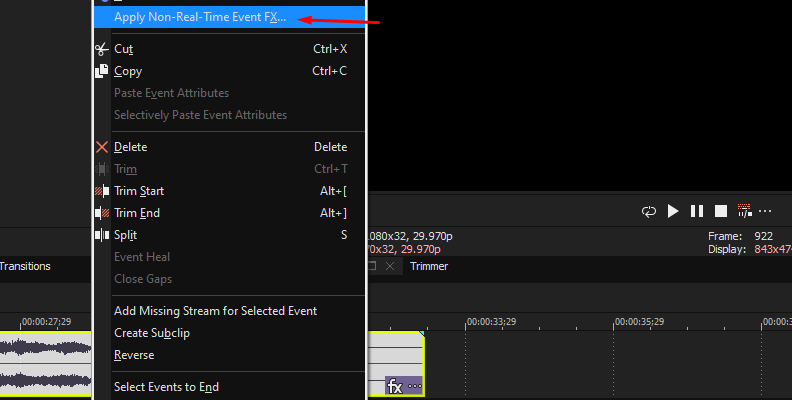
- Right-click the audio track with noise, select Apply Non-Real-Time Audio Event FX, or click the track FX button. In the following window, find and select the Track Noise Gate effect and click OK.
- In the Audio Track FX window, click Track Noise Gate to see the noise gate controls.
- The noise gate has three parameters: Threshold level, Attack, and Release time. Adjust the Threshold level slider to determine the volume at which the noise gate will kick in, removing everything below that level.
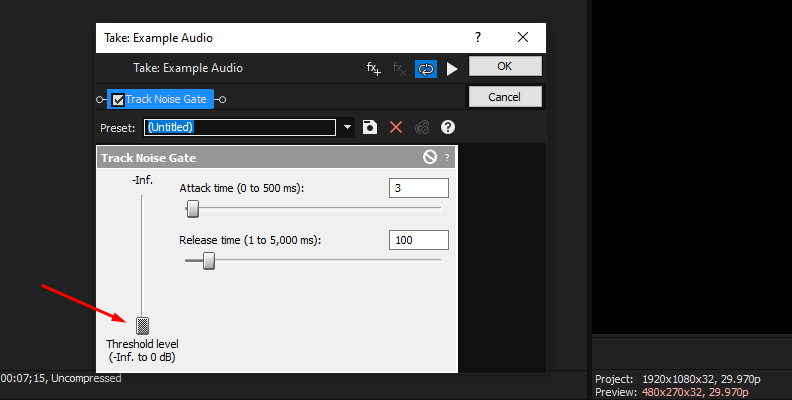
- The Attack and Release times control how fast the noise gate starts and stops. Play the audio, and if you hear the voice cutting off, adjust the Attack and Release sliders to find a balance and achieve smooth background noise reduction.
- Right-click the audio track with noise, select Apply Non-Real-Time Audio Event FX, or click the track FX button. In the following window, find and select the Track Noise Gate effect and click OK.
Step 4: Work with the Track EQ
When the noise in your audio is at a certain frequency, such as a constant hiss, hum, or white noise, a Track EQ can help you reduce the unwanted noise while protecting the frequencies where the voice is to avoid affecting its quality.
What the EQ does differently is that it lowers the volume only at a particular frequency. So, even if the noise changes in volume, for example, from walking near the noise source with the microphone, as long as it stays in that frequency range, the EQ will lower the volume for that frequency and not affect the overall sound.
However, be careful when removing noises close to the voice frequency range or audio tracks with more than one speaker, as voices can vary in frequency and overlap with the selected range.
- Click the FX button on the track or right-click the affected track and select the Apply Non-Real-Time Audio Event FX option. Search for the Track EQ effect and click OK to add it to the audio events effect chain.
- Select the Track EQ in the Audio Track FX window to display its settings with a graphic showing a flat line and four numbered points. Vertically, you see the volume in dB, and horizontally, you see the frequency range, going from the lower frequencies on the left (point 1) to the higher frequencies on the right (point 4).
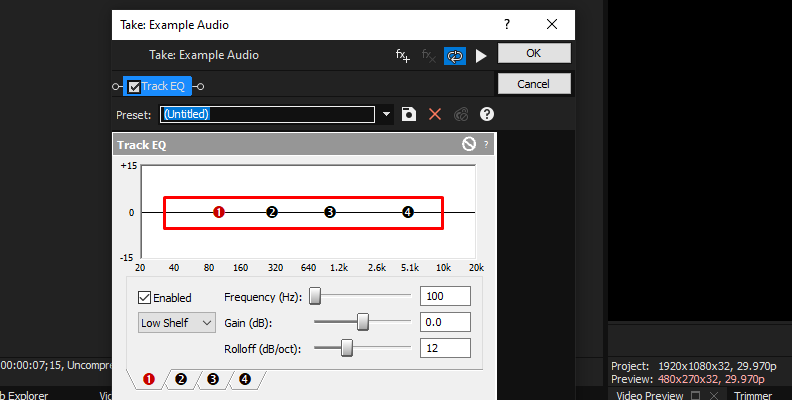
- Click and drag down the point at the affected frequency to reduce its volume. All the affected areas will turn blue. You can also drag the point left and right to pinpoint the frequency range.
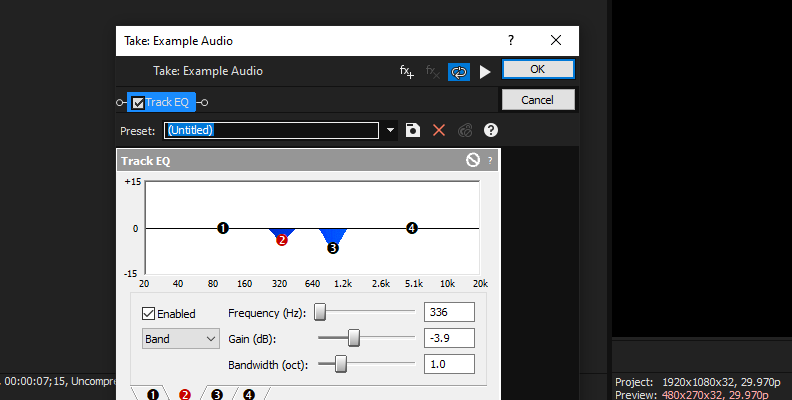
- Play the audio and adjust the Track EQ to keep the background noise volume as low as possible without distorting the voice. Create a loop region if you must fine-tune the EQ in tricky sections.
- Double-click the event and adjust the yellow arrow to the part you want to loop. Right-click the loop region and select Loop Playback.
Listen to the audio to ensure the EQ does not affect parts of the voice. Sometimes, leaving a bit of noise is preferred to making a voice sound weird or robotic.
Step 5: Add a Track Compressor
If you have an audio file with varying unwanted background noise volume, the Track Compressor will even the volume by increasing the quietest parts and lowering the loudest ones. It's useful to add a compressor at the end of the chain after using a noise gate or EQ or when you lower the audio volume to bring back clarity to your audio.
- Right-click the track and apply a new audio event FX.
- Select the Track Compressor and click OK.Click the Compressor tab in the Audio Track FX window.
- Adjust the output gain and threshold level where you want the compressor to kick in and the amount of compression to apply.
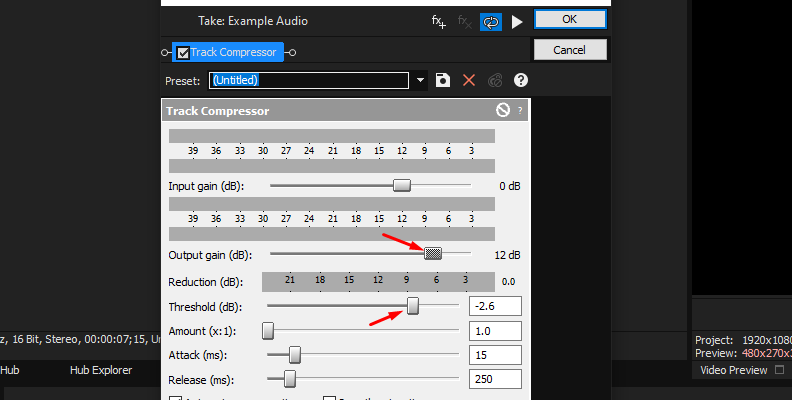
- Create a loop region as you did in the EQ step, and adjust the Attack and Release.
- Play with the other settings to find a good balance between noise reduction and audio quality.
Step 6: Use Sounds Effects and Music
Sometimes, simply adding background music and a few sound effects can mitigate the background noise while enhancing the scene.
Music is usually added to musicalize a scene or section in a podcast and add emotion, but it also allows us to hide and reduce background noise when nothing else has worked. Adding effects that complement the scene, such as environmental sounds, can mitigate the noise while improving the soundscape.
Use these techniques wisely, and avoid adding sounds everywhere to remove background noise. For instance, a drumming rhythm or clapping would be inappropriate for a serious interview.
Here's how to do it:
- Import a media file with music or an audio effect into your VEGAS Pro project.
- Drag the audio clip to the timeline and place it in the specific audio clip with audio noise.
- Lower the volume of the audio file so that it is low enough to hear the voice but loud enough to remove background noise.
How to Avoid Background Noise
In this section, you’ll find tips to help you reduce background noise at the time of recording.
Method 1: Recording Locations
Avoid recording in locations where you know background noise is present, as it will be hard to find a quiet moment, such as near airports and bus terminals, construction sites, roads with heavy traffic, and parks.
If you must record outdoors, wear a lavalier microphone to keep it close to you and away from the background noise.
Method 2: Correct Mic Placement
Place the microphone near the person speaking, preferably pointing at the mouth or the source you are trying to capture. For video recording, use lav microphones attached to the person's clothes instead of the camera’s mic, so it’s closer to them. Another option is to use boom arms and mic stands to keep the microphone steady and reduce the chances of bumping it or rustling noises from lav mics.
Method 3: Turn Off Electronic Devices
When recording at home, it's common to have the AC on, a mobile device, fans, or even mini-fridges around. These electronics produce low-level noise that the microphone picks up, even when we don't hear them.
Method 4: Soundproof and Acoustic Treatment
Invest in soundproofing and acoustic treatment for your home studio or recording location. You can design and build your studio from scratch or use foam panels to cover doors, windows, and other open areas to reduce background noise.
Alternatives to VEGAS to Remove Background Noise
Here's a list of alternative tools to remove background noise in VEGAS. Some of these options can be used inside VEGAS, and some others are standalone applications that allow you to import the audio file, clean it, and import the new noiseless audio file to VEGAS to complete your project.
CrumplePop Voice Enhance
Try Voice Enhance Now!
Instantly transform any voice recording into professional-quality sound with the power of AI. No internet access required- your audio stays private and secure. Toggle it on/off to hear the difference.
On-location Interview
Selfie-style Phone Audio
Zoom Call
Ridiculous Echo
Traffic Noise
Far from Mic
Untreated Room
Recording at Home
On-location Interview
CrumplePop Voice Enhance is an AI-powered voice enhancer and background noise removal plugin that processes the audio on your machine. It’s easy to use and helps you improve vocal clarity, achieve even audio levels, and remove background noise and echo, regardless of the recording environment.
To use Voice Enhance to remove background noise in VEGAS Pro, download and install it.
- Create or open a VEGAS Pro project.
- Select the audio clip in the timeline and open the FX Track window.
- Search for Voice Enhance, select it, and click OK.
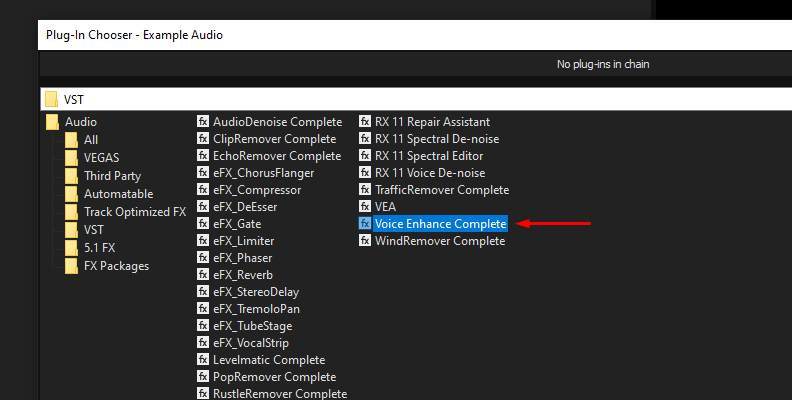
- Click the Voice Enhance effect to launch the plugin UI.
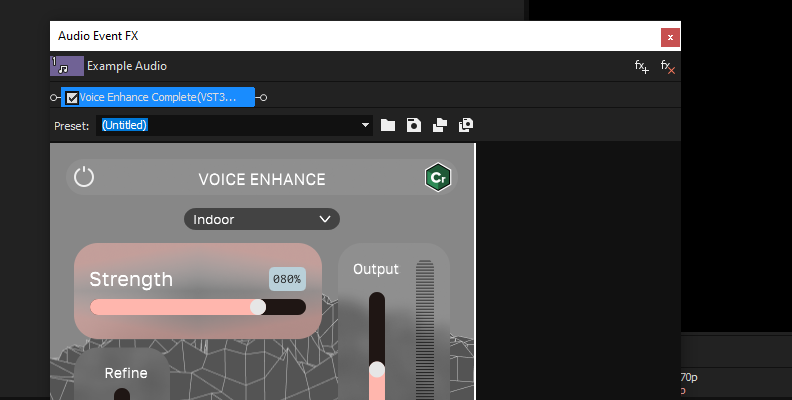
- Select a model to use and adjust the strength slider to set the amount of the effect to apply.
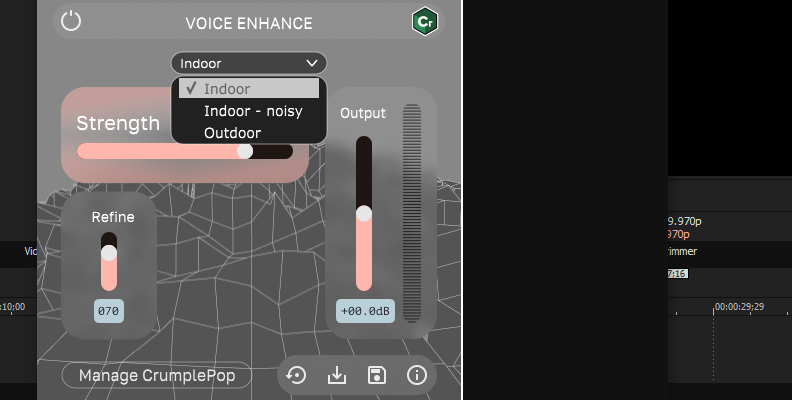
- Use the Refine slider to fine-tune the plugin and the Output to increase or lower the volume.
Adobe Audition

Adobe Audition is an audio editing software with audio restoration tools. Professionals and beginners use it because it offers basic and complex noise reduction tools, and allows you to visualize advanced audio analysis. The only drawback is that it can be hard to master. Thankfully, there are many resources online where you can learn if you take the time.
- Start by importing the audio into Audition.
- Go to the Effects menu, click Noise Reduction/Restoration, and then select Noise Reduction.
- Select the audio clip and highlight a section with only background noise.
- Click the Capture Noise Print button to create a noise profile.
- Select the audio clip and adjust the Noise Reduction slider.
- Play the audio and adjust the parameters as needed to reduce background noise.
- Click Apply when you finish.
Audacity

Audacity is a free and open-source audio editor with robust noise-reduction tools. It's easy to use, and since it's free, you can download it and start editing audio immediately. No subscription or activation is required.
- Open or record audio with Audacity.
- Select the track with background noise.
- Click on the Effects menu and select Noise Reduction.
- Click Get Noise Profile.
- Go to Effects > Noise Reduction and adjust the Noise Reduction slider.
- Preview and adjust the Sensitivity and Frequency Smoothing bands if needed.
Adobe Podcast Enhance Speech

Adobe Podcast is an AI-powered tool for podcasters. It features Enhance Speech, a tool to improve your audio and remove background noise. The downsides are that it requires an internet connection, uploads your audio files to the cloud, and has length and size limitations.
- Sign in to your Adobe account and go to the Adobe Podcast web.
- Select Go to Enhance Speech.
- Upload your audio file and wait for Adobe to process it.
- Listen to the result.
- Download the new file.
Krisp

Krisp is a noise cancellation app to record live audio without background noise from your computer, Zoom, and other applications, but it's not a post-production software for removing audio noise.
- Download and install Krisp.
- Select Krisp Microphone and Krisp Speaker in your recording app settings.
- Start recording.
Final Words
As you can see, there are many options to fix bad audio with background noise. Whether you work with VEGAS Pro's built-in tools or use external applications and plugins, you can save time and improve audio quality in just a few steps.
If you want to try an easy and quick tool to improve audio and remove background noise, download a free trial of CrumplePop Voice Enhance. You'll see how easy it is to use and configure to clean and enrich your vocal tracks.
Good luck!


