Adobe Audition is one of the most powerful digital audio workstations (DAWs) on the market, and it has cemented itself as a reliable, go-to solution for practically any audio related task you can think of.
One of the areas in which it really shines is noise reduction. There are many different types of noise reduction that Audition can undertake to remove noise but when it comes to wind noise, it really can make a huge difference.
Wind noise is just of those things it can be hard to avoid when recording outside. But knowing how to eliminate it can take even the most noisy recordings and turn them into pristine audio.
Remove Wind Noise in Adobe Audition
There are a few ways to remove wind noise from your audio file and the one you want to use will vary, depending on how severe the problem is. Sometimes, a quick fix can be done if it's just a small section of your audio that is affected, while other times, you might need to go into more detail.
Fortunately, Adobe Audition has plenty of ways to apply noise reduction so your recording can be successfully cleaned of wind noise.
-
Spectral Frequency Display
The first method is the spectral frequency display. This works by identifying where the sound is on your recording and eliminating it.
First, load the audio file you want to work on into Adobe Audition. Once you have done that, open the waveform of the audio by going to the Files panel and double-clicking it.
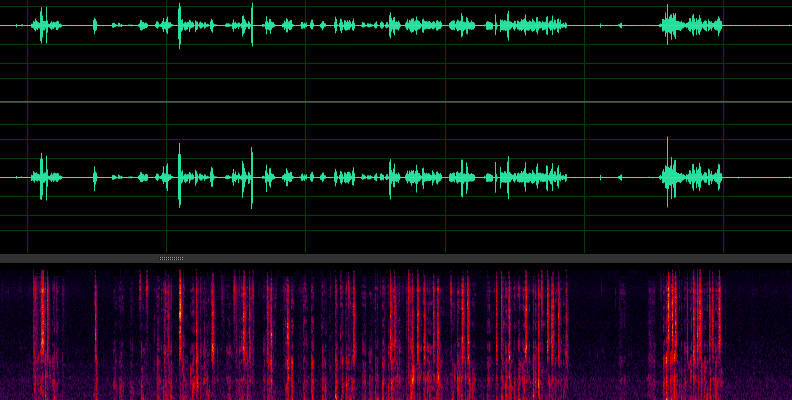
At the bottom of the panel, there is a small divider. Click and hold this to pull the divider up. This will show the spectral frequency display and a frequency analysis of your recording.
Keyboard Shortcut: SHIFT + D (Windows), SHIFT + D (Mac)This will give you a visual reference for the noise that you want to remove. The bottom part of the image represents the lower frequency spectrum, the middle, represents the middle frequencies, and the upper portion is the higher frequencies.
Wind noise generally occurs in the lower end of the frequency range, anything between around 20 to 250Hz. You can see this in the spectral frequency display as it will correspond to where you hear the wind noise when listening back to the audio.
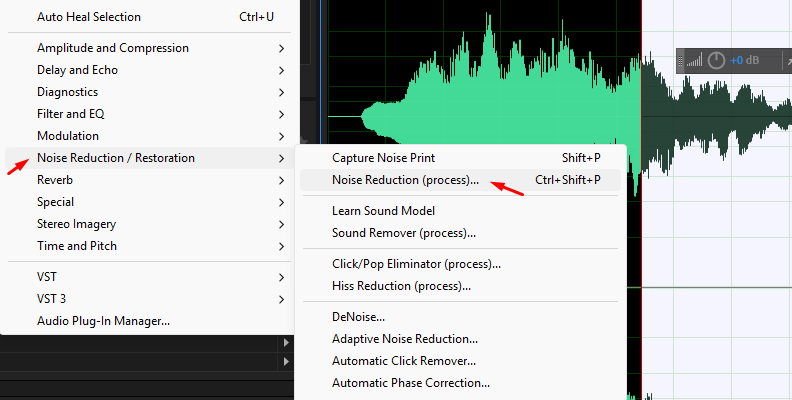
Once you have identified it, you need to eliminate it. To do this, select the portion that you want to eliminate. When it is selected, go to the Effects menu, then Noise Reduction / Restoration, and choose Capture Noise Print. This will allow Adobe Audition to analyze and understand the parts you want to eliminate.
Next, go to Effects, then Noise Reduction/Restoration and select Noise Reduction. Here you can select the strength of the the noise reduction effect. Adjust this until you are happy with the levels, then click OK.
The effect will then be applied to your audio.
-
High Pass Filter
Another way to eliminate wind noise is to use the high pass filter as a noise reduction tool. A high pass filter will remove low frequencies, where wind noise occurs, while leaving the rest of the recording untouched.
Open your audio file in Adobe Audition. Then, go to Effects, Filter & EQ, and select Parametric Equalizer.
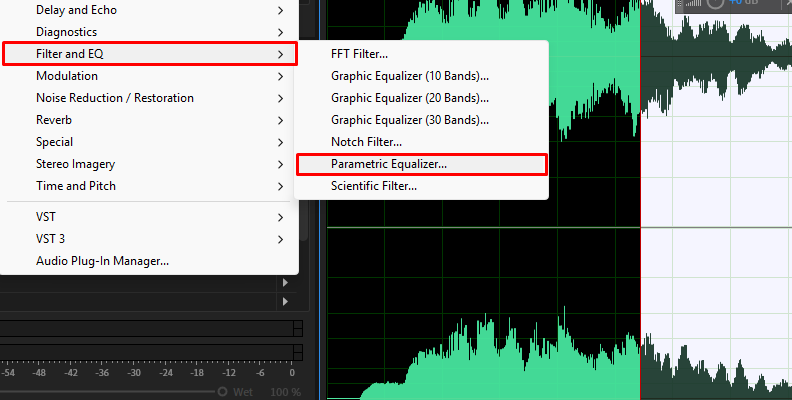
You will see the button HP, which stands for High Pass.
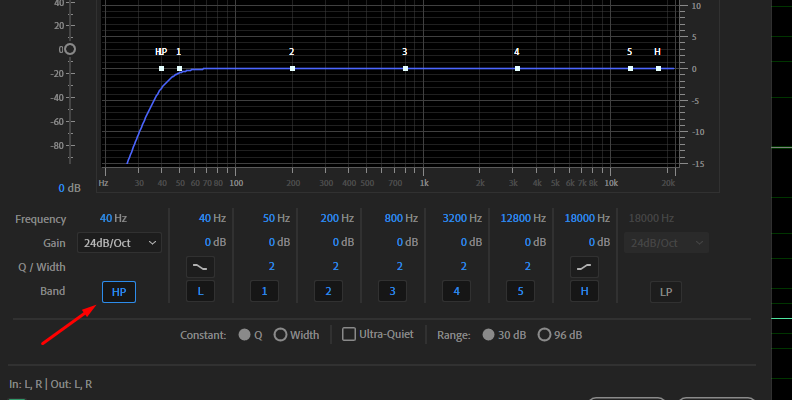
This will activate the high pass filter. You can adjust the frequency starting point. For wind noise, set this at around 20Hz to begin with, though you can vary this depending on the amount of wind noise you have or how it sounds.
You can adjust the gain control to adjust the amount of filtering that is being applied. You can also adjust the Q setting (this stands for quality) to adjust the width of the cutoff and control the amount the filter will reduce noise.
Once you have done this, click Apply. The noise reduction will be applied to your audio, and the wind sound will disappear.
-
Adaptive Noise Reduction
Adaptive noise reduction is a simple technique that allows you to isolate sound on your recording and have Audition automatically remove it. The adaptive noise reduction effect is extremely effective and allows the software to adjust and adapt to the noise you need to have removed.
First, find a part of your audio recording that only has the sound you want to eliminate. This needs to be a part where there is no other noise, so when nobody is talking. It's a good technique to record a few seconds of silence before you begin any recording, so you have ambient noise such as wind captured - this makes it easy for the software to remove it.
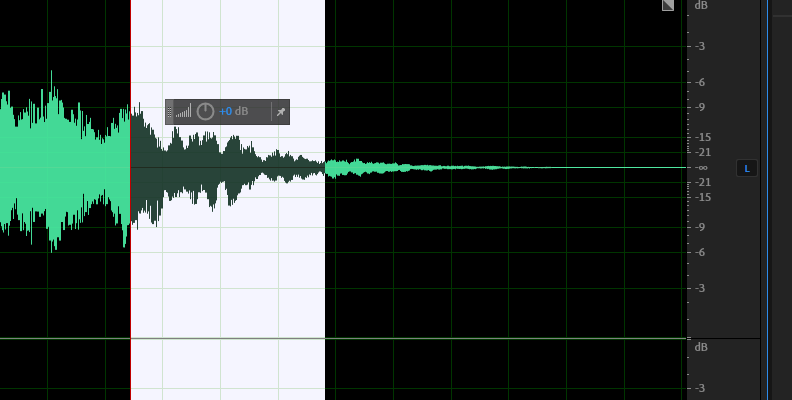
Select the section by left click and dragging the cursor. You only want to select a few seconds here.
Once you have selected the section, go to the Effects menu, then Noise Reduction / Restoration and choose Noise Reduction.
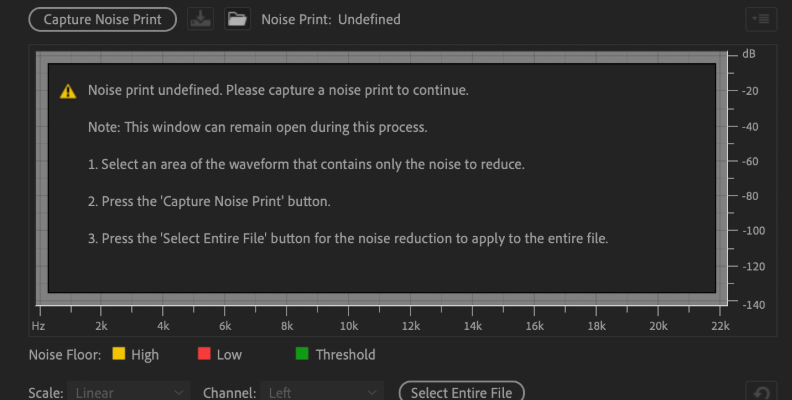
Click on the Capture Noise Print button at the top left-hand side. Adobe Audition will then analyze the selected section and understand that this is the sound that needs to be removed.
You can then either click on the Select Entire File (to apply the change to the entire audio track) or close this section and highlight the portion of the audio file you want to apply it to, then return to the Noise Reduction window.
When finished, click Apply. Adobe Audition will then apply the adaptive noise reduction and remove the wind sound.
It's worth noting that the adaptive noise reduction effect is effective at removing almost any kind of background noise, not just wind, so keep it in mind if you have any other noise removal tasks, such as getting rid of hum or hiss reduction.
-
Noise Gate
Because wind noise is a low frequency, it is also possible to use a noise gate to reduce unwanted noise. A noise gate allows you to set a threshold where anything that exceeds that threshold is automatically blocked. You need to set a noise floor, which is the amount of unwanted noise on the recording, and the noise gate will then eliminate this.
Firstly, select a few seconds of audio that only has the sound you want to eliminate recorded on it. As with noise reduction, you just want to highlight a few seconds.
Go to the Effects menu, choose Amplitude and Compression, then Dynamics. You will see AutoGate, which is what Audition calls a Noise Gate.
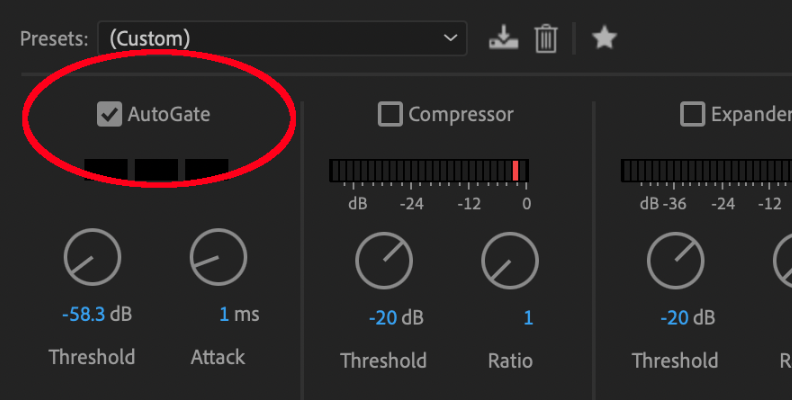
Put a check next to AutoGate, then set the Threshold to whatever level you require to eliminate the wind noise. You can experiment with this a little, as each recording will be different depending on how much wind noise you have captured.
When you are satisfied with the results, click Apply to apply the effect.
Remove Wind Noise in Adobe Audition with Wind Remover
Try Voice Enhance Now!
Instantly transform any voice recording into professional-quality sound with the power of AI. No internet access required- your audio stays private and secure. Toggle it on/off to hear the difference.
On-location Interview
Selfie-style Phone Audio
Zoom Call
Ridiculous Echo
Traffic Noise
Far from Mic
Untreated Room
Recording at Home
On-location Interview
When you need an effective but powerful way to remove wind or otherwise enhance any audio recording you have made, you can't do better than CrumplePop from Boris FX. WindRemover will instantly eliminate any background wind noise to ensure crystal clarity.
WindRemover is part of the CrumplePop range of audio restoration plug-ins. It is an easy to use plug-in that is available in VST3, AU, and AAX formats, so while it works perfectly with Adobe Audition, you can be sure that it will be compatible with any DAW or operating system you use.
Firstly, download the Boris FX Hub app to your hard drive, open the Hub, go to CrumplePop and download the VST3 version of the plugins.
Once you have installed the VST3 plugins, go to Adobe Audition, then the Effects menu, and choose Audio Plug-in Manager.
Click on the Scan for Plug-ins button. Adobe Audition will then scan the plug-ins folder and add Voice Enhance and any other new plug-ins that it discovers there.
Make sure to have these folders selected:
Windows: C:\Program Files\Common Files\VST3
Mac: /Library/Audio/Plug-Ins/VST3
Now that the plug-in has been installed, select the portion of audio you want to apply it to, or select the whole audio file if you want the effect to cover everything.
Go to the Effects menu, then VST 3, and select CrumplePop. Then choose WindRemover.
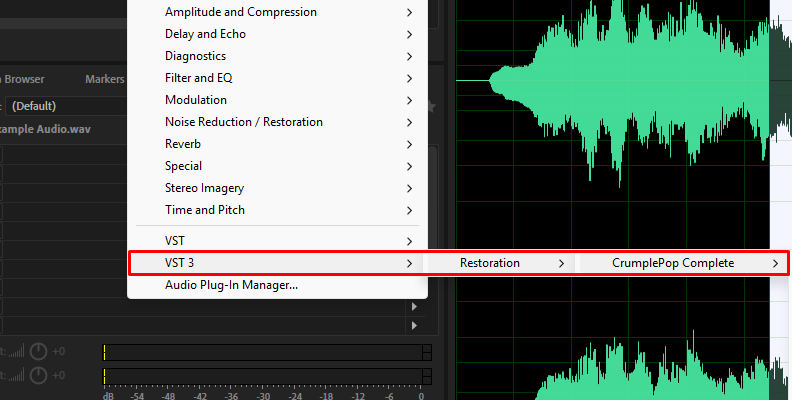
You can adjust the strength of the effect by moving the central slider, depending on how much wind noise you want to eliminate from your recording.
And that's it! For such a simple tool, the WindRemover plug-in can produce some genuinely amazing results with no technical knowledge required. It does well at removing wind noise, but other CrumplePop plugins can help fix distorted audio caused by other problems as well. For noise removal, these really are the best plug-ins you could hope for.
Final Words
Wind noise can be a difficult thing to avoid when you are recording out in the field and you may not even realize that your recording has been affected by it.
Thankfully, Adobe Audition has a number of different ways to apply noise reduction and get rid of unwanted noise. So now, even the worst recordings can be cleaned up and made to have fantastic audio quality and the kind of audio production anyone can be proud of.