Acquiring footage that matches your project's theme and importing it into Adobe Premiere Pro only to find out that it's blurry and not the intended video resolution can be disappointing, but unfortunately, it happens quite often in the video editing world.
Luckily, we have video upscaling software integrated into modern workspaces like Adobe Premiere Pro that can help us save video clips through detail-preserving upscale methods.
Suppose you came back from a recording session with a low-resolution video, and are simply looking for a way to make it crisp and more fitting for today's standards (like "reviving old footage" is common). In that case, this Premiere Pro tutorial should help you out.
So, without further ado, here's what you need to know to upscale video(s) in Premiere Pro.
How to Upscale Video in Premiere Pro

To upscale video in Premiere Pro, there are a few possible approaches. However, we believe that the "sequence settings" method is both easier and better.
Here's what you need to do to properly upscale a video in Premiere Pro using this method.
-
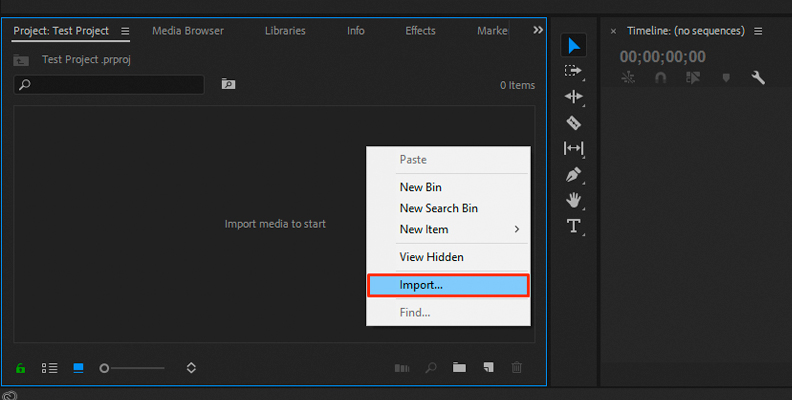
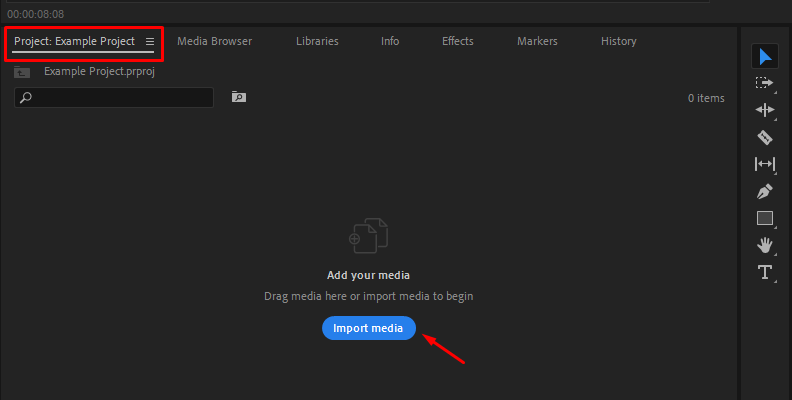
Step 1: Import Media in Premiere
First, we recommend creating a new project, as working on an already-existing one can cause some unwanted changes. So, try this method in a new, empty project.
Once you open the project, import the clip you wish to upscale within Premiere using the "Import" option, as shown in the image below.
-
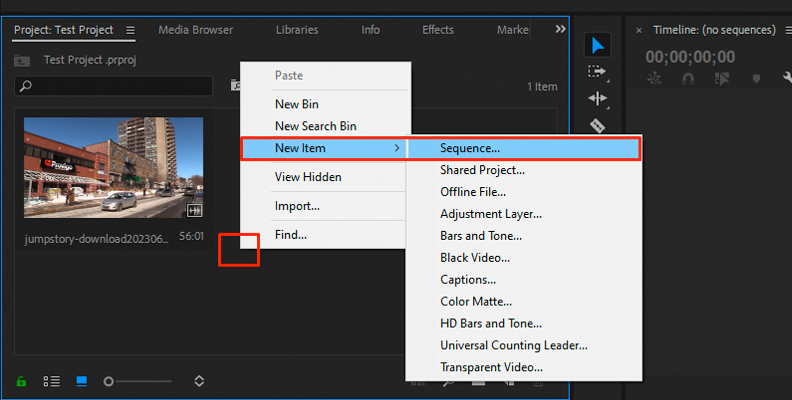
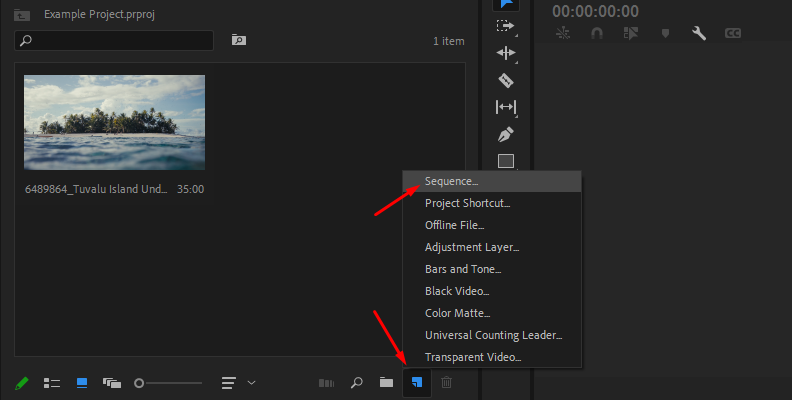
Step 2: Create a Sequence with Desired Resolution
Now that the clip is imported into Premiere, you need to create a new sequence with the target video resolution you wish to upscale to. For example, we've imported a 1080p clip that we'll upscale to 4K, so in this case, we need to create a new sequence with a 4K video resolution.
To do this, right-click an empty area within your "Project" panel, then choose "New Item" and click on the "Sequence" option.
Now, you'll see the "New Sequence" panel on your screen, and all you have to do is make a few changes.
After selecting your desired preset in the "Sequence Presets" panel (you can leave it as default as well), click on the "Settings" tab to switch to that panel.
In the "Editing Mode" field, set the preset to "Custom" which will allow you to manually input a desired video resolution. Before you do this, the "Frame Size" option under the "Video" section will be greyed out, and you won't be able to change it.
Now, simply set the "Frame Size" value to the size you wish to upscale your video to, which in our case is 3840x2160, resulting in what we call 4K, or Ultra-HD (UHD).
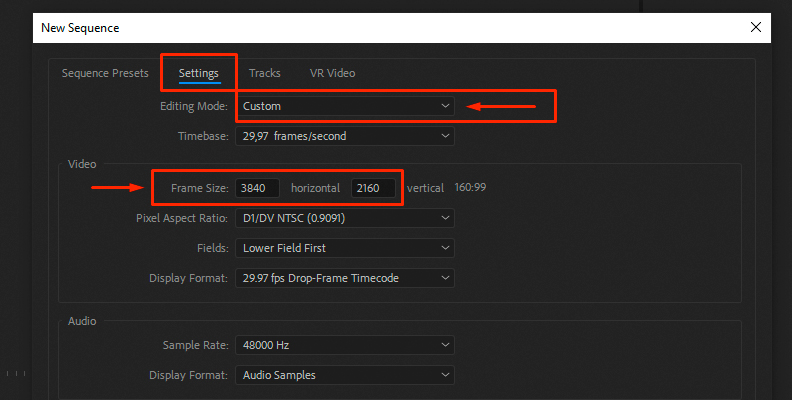
Rename your sequence (or leave it as default) and click the "OK" button at the bottom.
You've now created a 4K sequence.
-
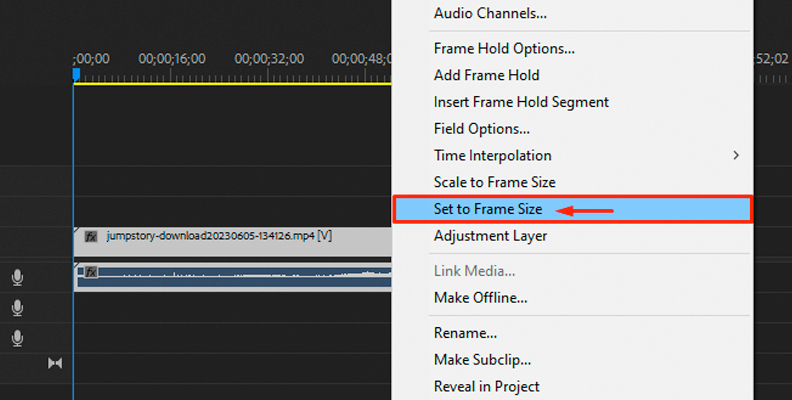
Step 3: Add Clip to Sequence and Use "Set to Frame Size" Option
Now that the sequence is created, drag and drop the video footage you previously imported over your 4K sequence.
At first, you'll notice that it doesn't fill up the preview frame at all, and there are black elements showing. This is because your current video is 1080p, and in a 4K sequence, it's not large enough to cover it. We'll fix this in just a second.
Right-click the video clip on your timeline and choose the "Set To Frame Size" option.
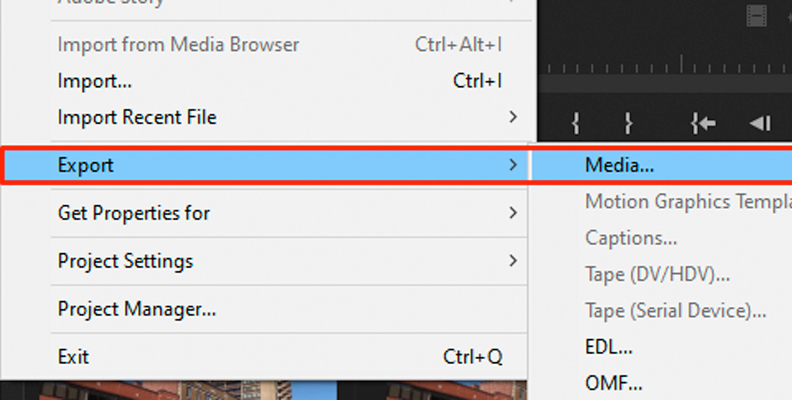
Now, all that's left to do is to export the video as 4K.
To do that, click on "File" in the top-left corner of Premiere, then use your cursor to hover over "Export" and click on the "Media" option.
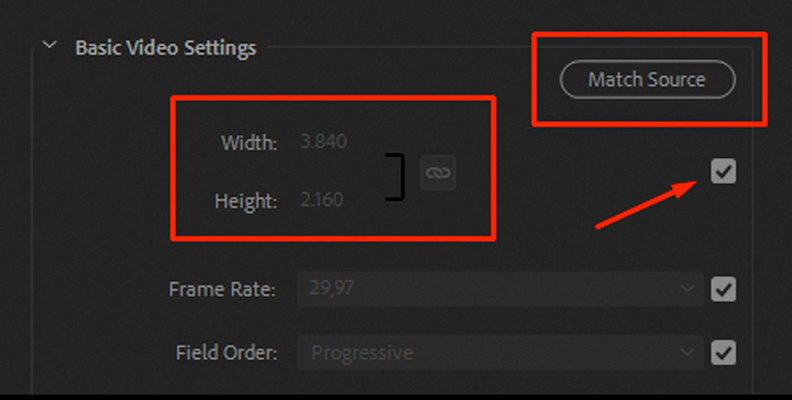
In the Export panel that will open, choose your format (keep in mind that some don't allow changing the resolution manually) and export the video as 4K.
In the "Basic Video Settings" panel, you can click the "Match Source" button and see if everything matches the video source settings. It should be automatically set to 4K, as the sequence we created earlier had the 4K resolution.
If you wish to change the resolution manually, untick the grey box shown in the image below, and that will "unlock" the section and allow you to change the numbers.
That's how to upscale 1080p to 4K video clips in Premiere Pro, or any other original video size (source resolution) to a specific target (upscale) resolution, but once again, keep in mind that "the bigger the jump," the worse the quality.
How to Upscale Video in Premiere Pro with Continuum's BCC+ UpRes ML from Boris FX
You can "turn" an HD video into a UHD video using BCC+ UpRes ML by Boris FX.
BCC+ UpRez ML is a plug-in that's part of Continuum by Boris FX. While this was exclusively available in After Effects, it is now available for all popular video editing hosts like Avid Media Composer, VEGAS Pro, Premiere Pro, and DaVinci Resolve.
UpRes ML uses AI to intelligently upscale video to produce fantastic results that simply aren't possible with native software. This ensures the improved resolution looks as good as possible and avoid the blurring, noise, and distortion that can sometimes occur with other upscaling video effects.
-
Step 1: Import Video in Premiere Pro and Create a Sequence
Like in the previous method, the first step is to import the video material you wish to upscale within Premiere Pro.
Now, create a sequence by right-clicking an empty area within the "Project" panel and choosing New Item -> Sequence. Drag your clip over to the timeline area, and once it's there, you are ready to proceed.
-
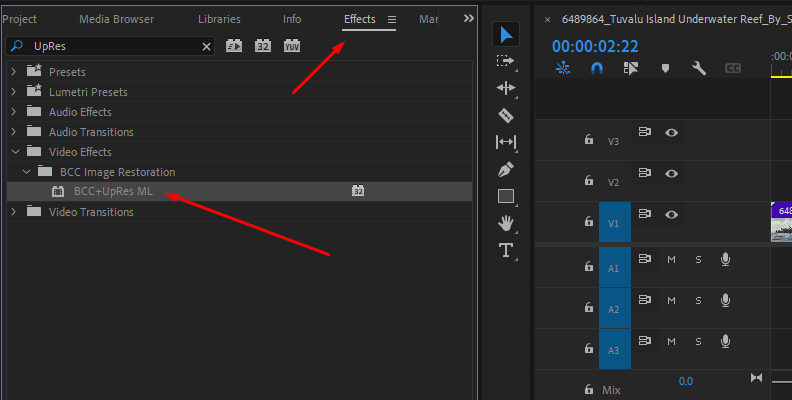
Step 2: Apply the UpRes Filter
You can then go to the Effects panel and do a search for UpRes. This will be located in the BCC Image Restoration category. Drag and drop the effect to your video on the timeline.
In the Effect Controls panel, select the amount you want to increase the resolution by in the Scale setting. Increasing it to 150 will increase the resolution by 150%, 200 will be 200% and so on.
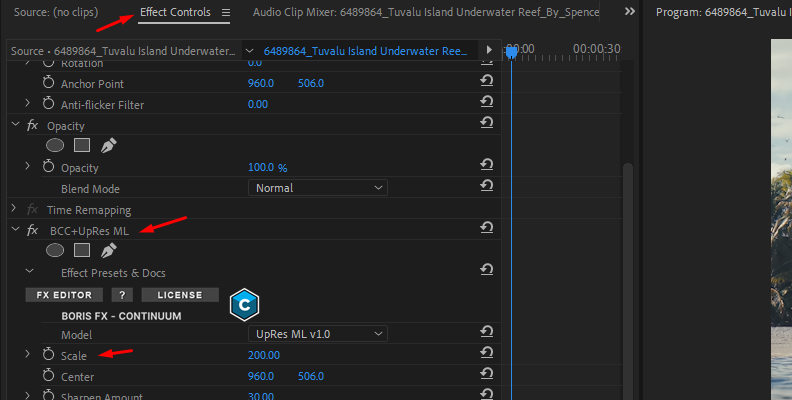
It's worth noting that the first time you apply this effect, it is going to take some time to process. However, on each subsequent use the processing time will be noticeably faster, so don't be alarmed at the process time the first time you try and use the effect.
Apply the effect and the upscaled video will be rendered.
-
Step 3: Render and Replace
Once the effect has been applied, it's a good idea to render and replace in your timeline. This will allow you to have real time playback.
Right-click the clip on the timeline and choose Render and Replace.
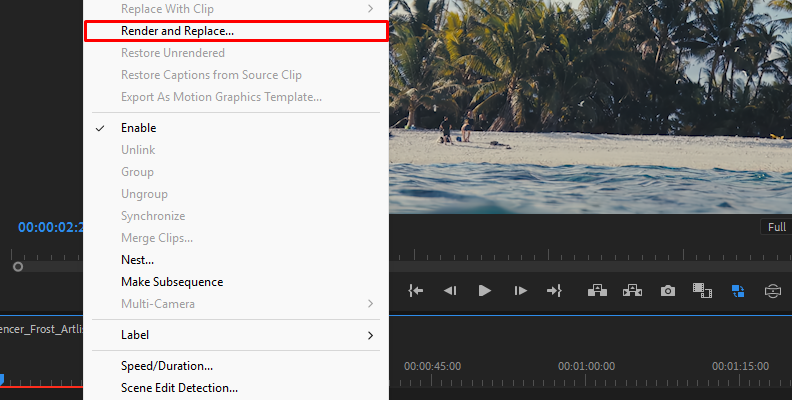
Choose the format and preset you require for output. You can also choose whether to store the clip next to the original on your timeline or output it to a separate file on your hard drive.
Click OK. Your clip will then be rendered and will replace the original on your timeline.
If you want to go back and make any chances, for example if something hasn't quite come out the way you want, you can right-click the clip and go to Restore Unrendered. This will replace the rendered clip with your original and allow you to make adjustments to scale, sharpness, and other components until you get a result that you are satisfied with.
Once you have made the changes, simply re-render the clip and check the results. And that's it!
Final Words
That's all you need to know for upscaling a video in Premiere Pro.
It's a process that may save the day when done with professional plug-ins or premium detail-preserving upscale video AI software, but there is no "magic tool" that can turn a really pixelized video into crystal-clear footage.
Hopefully, this will help you in the future, as the need to upscale video(s) is present almost on a daily basis when working as a video editor.
FAQ
This section contains some of the most frequently asked questions on video upscaling topics. If anything is still unclear after reading this guide, you should be able to find the answers in the following sections.
What is Upscaling Video?
To "upscale video material" essentially means to increase its resolution so it can "fit" on high-resolution devices, like 4K or 8K TVs, for example.
If you have a 720p video, upscaling would mean virtually enhancing its native resolution to 1080p (Full HD) or sometimes even more.
However, the more you "force" the upscaling, the higher the chances of seeing unwanted results. Trying to upscale a 480p standard definition video to 4K is almost impossible to do, whereas 1080p to 4K is much easier, as the difference in quality isn't that extreme.
What is The Best Way to Upscale Video in Premiere Pro?
The best way to upscale video in Premiere Pro is by taking the "sequence approach" mentioned earlier in this guide. This means creating a 4K sequence and "dropping" a 1080p video in it, if you wish to upscale from 1080p (FHD) to 4K (UHD). The same applies to 480p to 720p, etc., and upscaling video will not change the frame rate.
A good reason why this is better than simply increasing the values in the "Export" panel is that text and graphics will remain native and won't "morph" in the final result. That means you won't have to undertake any additional production, such as color correction, pixel correction, etc.
To get the highest quality upscale for you video content, an AI video upscaler like Continuum's BCC+ UpRes ML will give you the best image possible while increasing the size without losing quality.
Can Upscaling Improve the Quality of My Video?
Upscaling can improve the quality of your video. However, a video with a higher native resolution will always look better and contain more detail.
You can take a 1080p video and export it as 2160p, and it could (not always) look a bit better compared to the same video being exported in 1080p due to the higher bitrate. However, if you compare it to a video recorded natively in a 2160p resolution, that one will always look better. A higher resolution for the original video will always produce better results.
That said, generally, upscaling can introduce noise, artifacts, and blurry results. You can use AI technology like BCC+ UpRes ML to upscale your videos and preserve the quality of the final output.
What Should I Choose in Sequence Settings?
In sequence settings, as shown in the method above, you should set the resolution that you wish to upscale your video to, also referred to as the "Target Resolution".
So, if you wish to do a 480p upscale to 720p, set the sequence settings to 720p. If you wish to do 1080p to 4K, as we did in the example shown above, set the resolution to 4K, which is 3840x2160.
You should also set the editing mode to "Custom" as that will allow you to change resolutions manually.
What Does it Mean to Increase Video Resolution?
Increasing video resolution means increasing the number of pixels the footage is made of. However, this is impossible without sophisticated video upscaling software that can re-generate the footage without causing any unwanted effects, and even then, it won't be perfect.
Premiere Pro can do this to some degree, and After Effects is also known for its detail-preserving upscale algorithm that can turn a low-resolution video into something much "crispier".
We'd suggest trying Continuum's BCC+ UpRes ML to upscale footage. It's easy to use and produces clean upscaling without the artifacts and distortion by using advanced machine learning technology.